
Keep Produce Fresh with Cotton Sacks
You can keep fruit and veg fresh for months with cotton sacks. Use simple steps and steady habits. You save money. You cut waste. This guide shows how to sort, pack, store, and care for your harvest all winter long.
What You Need

Keep Produce Fresh Longer: Top Produce Storage Tips
Choose the Right Cotton Sacks
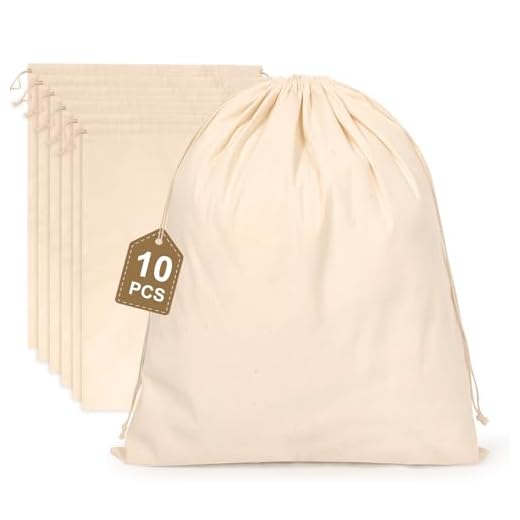
The bag matters. The wrong one ruins months. Which cotton wins?Pick plain, uncoated cotton. Use a tight plain weave that still breathes.
Choose new sacks that will not hold smells or coatings.
Avoid plastic-lined or waxed sacks. They trap moisture and rot crops.
Size sacks to the crop. Use big sacks for potatoes. Use small sacks for shallots or garlic.
Wash new sacks in hot water and dry them. Expect new cotton to shrink on the first wash. Wash removes dust and factory smells.
Use sacks with drawstrings or make a tied top. Close sacks loosely to let air move. Mark each sack with a pencil or a strip of tape. Note crop and storage date. Write on the tape or tag, not the fabric.
Buy a few spare sacks for rotation and repair. Keep at least two extra for each crop you store.
Sort and Cure Your Harvest
Want months of freshness? Start with hard choices. Toss the tired pieces.Sort with care.
Remove bruised or split items.
Discard rotted pieces. One bad piece spoils many.
Cure root crops when needed.
Cure onions and garlic in warm, dry air for 7–14 days.
Cure winter squashes and pumpkins until skins harden.
Let potatoes dry in shade for a few days to toughen skin.
Cut tops off long‑storing veg like beets and carrots.
Leave a short stem on onions.
Do not wash most roots before storage.
Brush off loose soil. Dirt helps preserve them.
Label each lot with date and type.
Mark sacks so you know what and when.
Check one sack now and then to learn what works.
Try an onion cure for a week and record the result.
This first step sets how long they last.
Pack Produce Smartly in Layers
Stack like a mason. Leave air. Space saves food.Layer with care. Put a breathable liner or plain paper between layers so items do not rub.
Keep sacks no more than two thirds full. Let air move. Do not pile high. A heavy pile bruises the bottom fruit.
Separate ethylene producers. Place apples away from leafy greens and potatoes. For example, keep apples in their own sack or on top of other produce.
Wrap fragile fruits in paper or cloth. Cushion with loose filling like straw or folded paper. For example, wrap pears in newspaper and nest them in straw.
Fold sack tops and tie lightly. Face labels outward so you can read them without opening the bag.
Quick rules:
Fold tops with a small ventilation fold or pin a dated card to the bag if the sack will sit for months.

Store Sacks in the Right Place and Monitor
Cool, dark, stable. Not damp, not hot. Little checks keep months of food.Find a cool place. Basements, cellars, or a cool closet work well. Aim for a steady temperature. Most roots like 32–40°F. Onions and garlic like 40–50°F. Keep light low. Light wakes sprouts.
Control humidity. Keep it moderate. Too dry and veggies shrivel. Too wet and rot spreads. Use a hygrometer if you have one. Keep sacks off the floor on racks or pallets. Space sacks apart so air can pass.
Check weekly. Feel for soft spots. Smell for off odors. Move a sack if you find trouble. Pull a single bad item. Small action stops big loss. For example, take a soft potato out and eat it that week. If you smell rot, open sacks and air them for a day.

Maintain, Rotate, and Repair
A stitch saves yield. Inspect, mend, use. Never leave a rot to spread.Inspect sacks often. Open a sack and look inside. Pull out any soft or rotten item. Toss or cook spoiled pieces at once.
Mend holes quickly. Sew tears with strong thread or patch with spare cloth. Tie loose seams. Reinforce corners that rub.
Rewash sacks if they smell. Hang them to dry in sun. Air a sack on a dry day for two hours if it smells damp.
Rotate stock on a FIFO rule. Move older sacks forward. Use older produce first. Relabel dates when you move items. Mark with a pencil or tag.
Keep a simple list. Note sack contents, pack date, and problems. Check the list when you pick items. Track what lasts and what fails.
Use a quick example: mend a torn potato sack the night you find it. Move that sack to the front. Eat the softened potatoes first.
Small fixes keep your store for months.

Start and Save
Buy or make cotton sacks. Sort and pack with care. Store and check weekly. Mend and rotate. You will cut waste and keep food months. Try it. Share your results.


Nice write-up. One thing I wondered: the guide talks about repairing sacks. Has anyone patched a sack successfully? What’s the best technique?
I use a sewing machine for big tears — much quicker. For tiny holes, fabric glue + a patch works in a pinch.
Simple hand-stitching with natural cotton thread works well. A small patch sewn on the inside prevents loose threads catching produce.
Question: any thoughts on washing produce before packing? I like clean veggies, but maybe I should wait. The guide says sort and cure, but not whether cleaning is ok first.
I only brush off big clumps of dirt. Washing makes me nervous unless I plan to use them right away.
Also remember that some produce (like apples) benefit from a light wiping but not soaking.
If you do rinse, spread them out to dry in a shaded spot for a day. Never pack damp produce!
Best to remove excess dirt with a soft brush and let produce dry completely before packing. Washing with water can introduce moisture that promotes rot unless you dry them thoroughly.
This is a rookie mistake I made once — ended up with soggy sacks. Learned to wait.
Small thing: cost estimate seems low if you buy new cotton sacks. Look for secondhand or bulk to save — also check local farms that might sell off old sacks cheap.
Farm supply stores often have used sacks. I scored a bunch for almost nothing.
Good point. Prices vary widely; we’ll add a tip to look for secondhand sources and bulk discounts.
Local Facebook marketplace is gold for this kind of stuff.
Minor nitpick: the step about layering wasn’t clear if heavier produce goes bottom or top. I tried both and ended up bruising apples when they were underneath. Figured out heavier bottom = less damage.
Thanks — heavier on bottom is the safer rule. We’ll clarify that in the layering section.
Agreed. Put dense root veg below and delicate fruit on top. Also pad between layers with straw or shredded paper.
Bringing this up again: I stack sacks with bubble wrap between layers for delicate transfers. Sounds silly but it saved a few apples.
This method is great for root veg but does anyone use cotton sacks for leafy greens? I feel like they’d wilt fast. Curious if anyone tried it and had success.
Leafy greens are usually better short-term refrigerated or in a cool, humid crisper — cotton sacks are best for drier, cured produce like onions, potatoes, winter squash.
Maybe if you packed them with damp paper towels? But still risky. I wouldn’t recommend.
Yeah I tried lettuce once and it was a disaster. Stuck to the sack and turned slimy. Learned my lesson 😆
Great guide — I actually tried cotton sacks last fall and it worked way better than plastic bins for my potatoes. The tips on curing and sorting were spot on. Quick question: how tightly should the sacks be tied? Won’t that trap moisture?
I leave about an inch of opening and fold the top over. Keeps bugs out but lets the air move. Also check sacks weekly for any damp spots.
Same here. If I see condensation, I loosen and let them breathe for a day.
Good question — you want them tied loosely enough to allow some airflow but not so loose that pests can get in. A simple knot with a short tail usually works well.
Love the ‘Start and Save’ section. The budgeting breakdown helped me decide to make my own sacks from an old bedsheet. Quick DIY: cut, hem the edges, and add a drawstring. Cheap and works great.
That’s a great sustainable approach! Reusing old linens is both economical and eco-friendly — just make sure fabric is breathable and clean.
I made some with an old canvas curtain — heavy-duty and lasts years.
I did cotton t-shirts sewn together. They breathe well but I would avoid synthetic blends.
I monitor my storage room with a cheap hygrometer — huge difference. If humidity spikes above 65% I open the sacks for a few hours. Highly recommend adding a monitoring note in the guide.
Great tip — hygrometers are inexpensive and very useful. We’ll consider adding a monitoring checklist in the next revision.
I avoided silica — prefer a natural approach. If humidity’s low, occasional misting of the room (not the produce) helps.
Do you use silica packs or anything inside the sacks? I’m tempted to try small desiccant pouches but worry they might over-dry.
This guide is handy but I’d love a quick checklist printable — like a one-page ‘do this before packing’ list. Anyone made one?
I made my own checklist in Notes app — simple and effective.
We’re working on printable checklists for each section. Meanwhile, here’s a quick list: choose sacks, cure produce, brush/dry, layer with padding, store cool/dark, monitor weekly, rotate/repair as needed.
If you want I can share a template I use — PM me? (Not on post, but happy to help.)
I had a weird issue: mice chewed the bottom of a few sacks. Any good critter-proofing tips besides traps?
Have a cat? 😼 Kidding but true — predators help. For serious infestations, professional pest control.
Try elevating sacks on pallets and using metal mesh around the storage area. Also, avoid storing sacks near food waste that attracts rodents.
Peppermint oil soaked cotton balls around the perimeter helped me. Not foolproof but reduced visits.
Love the part about rotation — such an easy habit to ignore. I set a monthly reminder on my phone to rotate sacks and it actually keeps my stash usable longer.
Also, keep an inspection log on a clipboard near the storage area. Quick notes like ‘checked 10/2 – all dry’ help track problems.
If you’re into spreadsheets, a quick inventory sheet helps plan meals around oldest produce.
I use a simple rotation label — ‘Use by’ dates on tags. Makes it easy for the whole household to follow.
That’s a brilliant practical hack — tech reminders make maintenance consistent.
Long post — forgive the novel, but I want to share my experiment:
I cured my onions for 3 weeks and used thick cotton sacks. I layered with straw and put them in a cool dark corner of my garage. I checked them every 10 days and removed any with soft spots. Results: 90% lasted 4 months, which is huge for my small kitchen garden.
A couple notes: the straw helped absorb humidity, and curing properly is EVERYTHING. If you rush the cure, you’ll get rot. Hope this helps 😊
Thanks for sharing the detailed process — the straw trick is a great moisture buffer. Your monitoring routine is exactly what we recommend.
Wow, 90% is awesome. Did you store different veggies together or keep onions separate? I heard onions and potatoes shouldn’t be stored together.
Honestly this saved me a ton of space. I stacked sacks in my shed using pallets like the guide suggested. Pro tip: label the sacks with the pack date — you won’t remember otherwise 😂
Haha true! Also, stack heavier sacks on the bottom to avoid crushing delicate stuff like apples.
Labeling also helps if you share storage with roommates/family — no accidental snacking from the oldest sack 😅
I use clothespins + paper tags. Cheap and you can move them as you rotate produce.
Labels are a life-saver. Some readers use chalk on cardboard tags attached to the sack — easy to change and eco-friendly.