
Welcome to our step-by-step guide on how to make gluten-free waffles using the Cuisinart WAF-300P1 Belgian Waffle Maker. Perfect for those with gluten sensitivities or anyone seeking a tasty breakfast alternative, this guide will walk you through each step to ensure your waffles turn out light, fluffy, and absolutely delicious. Get ready to enjoy a delightful gluten-free treat that’s easy to make and sure to impress!


Waffles Without Gluten
Gather Your Ingredients
Gather all the necessary ingredients for your gluten-free waffle batter. Start with gluten-free flour, which serves as the base for your waffles. Measure out the required amount using measuring cups, ensuring accuracy for the best results. Next, add baking powder to help your waffles rise, followed by sugar for sweetness and salt to enhance the flavors. Crack a few eggs into a mixing bowl, and pour in milk or a dairy-free alternative, depending on your preference. Finally, include melted butter or oil to enrich the batter and keep the waffles moist.
Prepare your measuring cups and mixing bowls in advance for a smooth cooking process. As you collect your ingredients, double-check that you have everything on the list. Organize your space to make the cooking experience enjoyable and efficient. Keep the gluten-free flour, baking powder, sugar, salt, eggs, milk, and melted butter or oil within reach. This setup will help you stay focused and create delicious gluten-free waffles with ease.


Prepare the Waffle Batter
Combine the gluten-free flour, baking powder, sugar, and salt in a mixing bowl. Use a whisk to ensure these dry ingredients are evenly blended, as this will help create a uniform batter. For example, if you’re using a store-bought gluten-free flour blend, make sure it contains xanthan gum for better texture. Measure accurately to maintain the right balance; this is crucial for the perfect waffle.
Whisk together the eggs, milk, and melted butter in a separate bowl. Choose whole milk for a richer flavor or almond milk for a dairy-free option. Once well-combined, gradually pour the wet mixture into the dry ingredients. Use a rubber spatula to gently fold them together until just combined, which may mean you still see a few small lumps. Avoid overmixing, as this can result in tough waffles; you want a light, fluffy texture when they cook.
Preheat the Waffle Maker
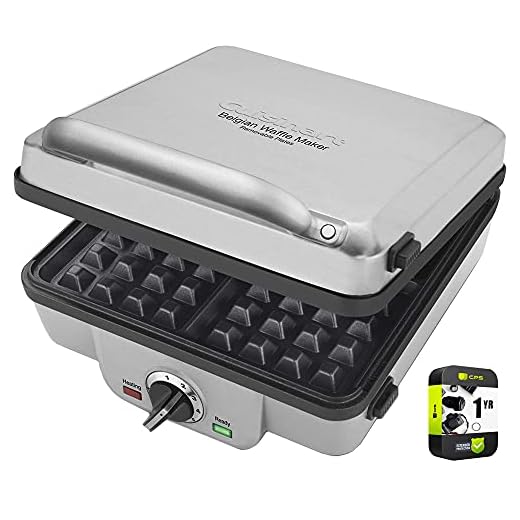
Plug in the Cuisinart WAF-300P1 Belgian Waffle Maker. Locate the power cord and insert it into a suitable electrical outlet, ensuring the unit is on a flat, stable surface. Turn the waffle maker on by flipping the switch to the “on” position, allowing it to start preheating. As the unit warms up, keep an eye on the indicator lights. The red light will initially illuminate, indicating that the machine is heating up.
Wait for the green indicator light to turn on, signaling that the waffle maker is preheated and ready for use. This light indicates that the cooking plates have reached the optimal temperature for cooking delicious waffles. Take this opportunity to prepare your waffle batter, making sure everything is ready to go once the green light appears. Enjoy the anticipation of creating fluffy, golden waffles as you prepare for your cooking adventure!
Cook the Waffles
Preheat your waffle maker until the indicator light signals that it’s ready. Lightly grease the cooking surface with non-stick spray or a small amount of vegetable oil using a paper towel or a brush. This step is crucial as it prevents the waffles from sticking and ensures an even, golden-brown finish. If you prefer, you can use melted butter for added flavor. Aim to evenly cover the plates without overdoing it, as too much grease can result in greasy waffles.
Pour the appropriate amount of batter into the center of the preheated waffle maker, typically about 1 cup, but this may vary depending on the size of your machine. Close the lid gently, allowing the batter to spread evenly into the waffle grid. Cook the waffles for about 4-5 minutes, checking for that perfect golden-brown color. If your waffle maker has a light indicator, wait until it indicates that the cooking process is complete. When the waffles are done, carefully open the lid and use a fork or tongs to lift them out, ensuring you don’t burn yourself on the hot surfaces. Enjoy your perfectly cooked waffles!
Serve and Enjoy
Carefully remove the waffles from the waffle maker using a fork or spatula, ensuring that you don’t burn your fingers. Gently lift the edges of the waffle with the fork or spatula, making sure to let any steam escape before fully taking it out. Place the waffles on a plate, giving them a moment to cool down slightly while you gather your favorite toppings.
Drizzle warm maple syrup over the waffles, allowing it to soak into the fluffy goodness. Add fresh fruit like sliced strawberries, blueberries, or bananas for a burst of flavor and color. Finish with a generous dollop of whipped cream on top, if desired, to make your breakfast a delightful treat. Enjoy your homemade gluten-free waffles while they’re still warm, savoring each delicious bite!
Enjoy Delicious Gluten-Free Waffles!
In conclusion, making delicious gluten-free waffles in the Cuisinart WAF-300P1 is a simple and rewarding process. By gathering the right ingredients and following the straightforward steps outlined in this post, you can enjoy a delightful breakfast that caters to your dietary needs. Don’t forget to experiment with different toppings to make each waffle experience unique. Happy cooking, and enjoy your gluten-free waffles!


I substituted almond flour for the all-purpose flour, and they turned out a bit denser but still really good! Just had to adjust the liquid a bit since almond flour absorbs more.
Great adaptation! Almond flour can definitely change the texture. Thanks for sharing your experience with that substitution!
I added a scoop of protein powder to the batter for a little extra boost, and it worked out great! It didn’t change the texture much, just made them a bit heartier.
That’s a fantastic idea! Adding protein is a great way to make breakfast more filling. Thanks for sharing your tip!
I just made these gluten-free waffles for brunch and they turned out amazing! I used Bob’s Red Mill Gluten-Free All-Purpose Baking Flour, and they were super fluffy. Thanks for the great recipe!
I tried following the guide, but my waffles stuck to the waffle maker! I greased it well, but they just wouldn’t come out. Any tips on preventing sticking?
Sorry to hear you had trouble! Make sure to give the waffle maker enough time to heat up before pouring in the batter, and try adding a bit more oil or using a non-stick spray. Also, letting the waffles cook a little longer can help.
Would love to see some tips on how to make vegan gluten-free waffles! I’m trying to cut back on dairy and eggs.
I made these last weekend, and my kids loved them! They devoured them with maple syrup and fresh berries. Definitely going to be a regular in our breakfast rotation now!
So glad to hear your kids enjoyed them! Waffles are always a hit with the little ones. Keep us posted on your future waffle adventures!
Anyone tried adding chocolate chips to the batter? I think that would be a great way to jazz these up!
Definitely! Chocolate chips are a delicious addition. Just fold them into the batter before cooking for a sweet treat!
I’d love to know some creative toppings for these waffles! Besides the usual syrup, what do you all recommend?
Try adding yogurt and fruit, or even a dollop of almond butter with banana slices. There’s so much you can do with toppings!