
Start with Care
You bought zero-waste pouches to cut waste and save cash. You want them to last. Treat them right. Keep them clean. Keep them whole. Keep food safe.
This guide shows five steps. Know Your Pouch helps you learn materials and limits. Clean and Dry the Right Way stops stink and mold. Fix It Before It Fails teaches quick repairs. Store Smart and Rotate avoids breakdown. Extend Life Through Use and Reuse finds new roles.
Follow these habits and your pouches will serve you for years. Small fixes add up and save.
Read fast. Learn to act. Save money. Cut trash.

What’s in My Zero-Waste Bags?
Know Your Pouch
Read the label first
Look for a care tag or printing. It will tell you what the pouch can take. If it says “hand wash only,” trust it. If it gives a max temperature, note it. Labels save you from cheap mistakes.
Spot the material
Pouches come in three broad kinds. Fabric. Silicone. Laminated or coated fabric. Each wears in a different way.
A Stasher-style silicone bag will survive a hot pan of soup you drop in. A laminated sandwich pouch will warp in a dishwasher.
Inspect closures and seams
Look close at the zipper. Is it metal, coil, or a water-resistant rubber seal? Metal teeth snag fabric. Coil zips flex but wear. Rubber seals keep out spills but can trap crumbs.
Find seams and weak spots. Run your finger along stitches. Feel for thin layers or glued joins. Heat-sealed seams look smooth. Sewn seams will show thread. A tug test tells you what will fail first.
Learn the maker’s limits
Read the maker’s care pages if you can. Many brands list dishwasher, microwave, freezer, and bleach rules. When in doubt, err on the gentle side.
Quick pouch checks:
Small tests that save pouches
Try a quick spot test. Clean a hidden corner. Heat a scrap with low temp. If the coating wrinkles, stop. If the zipper jams, fix it before use.
You now know what you hold. That knowledge points straight to how you should clean, dry, and store each pouch. Next: how to clean and dry the right way.
Clean and Dry the Right Way
Rinse and clear fast
Rinse your pouch right after use. A quick rinse sends crumbs and oils away. Do it at the sink. Turn the pouch inside out if you can. Shake and tap out loose bits.
Scrub or soak based on soil
For light soil, wash with warm water and a soft brush. Scrub gently. For stuck-on food, soak the pouch in warm water with a mild dish soap for 10–30 minutes. Then rub and rinse.
For stubborn smells, use white vinegar or baking soda. Try this:
Never reach for harsh bleach unless the care label says it’s safe. Bleach can eat coatings and fade colors.
Dishwasher and heat tips
Hand wash when you doubt the material. It buys you years.
If you use a dishwasher:
Heat can warp laminates and peel coatings. Silicone can take more heat, but check the maker’s rules.
A dishwasher cleans fast. It can also push crumbs into seams. Hand wash for seams and sewn joins.
Dry to stop mold and odor
Air dry every pouch. Do not store wet. Stand the pouch open so air flows through. Use a drying rack, a cup to prop it open, or clip it to a line. A damp pouch left in a bag can grow mold in 24–72 hours. Don’t give mold a chance.
If you need speed, towel the inside first. Then let it finish air drying. Never put laminated pouches in a hot dryer. Heat shortens life.
Use these moves and your pouches will last longer and smell better.
Fix It Before It Fails
You can stop a small tear from becoming a lost pouch. Catch damage early. Clean the area first. Dirt and oil block glue and hide holes. Use warm water and mild soap. Dry well.
Mend small splits fast
For tiny splits, use a food-safe fabric glue. Read the label. Look for “food-contact safe” or FDA-compliant claims. Apply a thin bead. Press the edges together. Let it cure fully.
If you have a fabric pouch, sew it. Use a short stitch. A backstitch works best. Knot well. Use strong thread — polyester or upholstery thread. Reinforce seams with a second pass if the pouch gets heavy use.
Fix laminated edges and coated seams
Laminated pouches need different care. Use heat-seal (fusible) tape made for laminates or coated fabric. Trim ragged edges. Lay the tape across the seam. Press with a warm iron or heat press on a low setting. Test one inch first. Heat seals last far longer than glue alone.
Replace zippers and pulls
A broken zipper pull is not the end. Replace the pull or slider. Universal zipper kits fit most sliders. Pop off the stopper, slide the new one on, and crimp the stopper back. If the track is damaged, swap the zipper or use a no-sew repair slider.
Patch from the inside for leaks
For leaks, patch inside the pouch. Inside patches protect food and keep seams neat. Cut a patch slightly larger than the hole. Glue or iron it in place. Press and clamp while it sets. Wait the full cure time.
Test before you use
Test every repair with water. Fill the pouch or cup the patched area. Squeeze. Watch for drips. Wait an hour. If it holds, it’s ready for snacks.
Build a small repair kit
Keep a tiny kit at home. It saves pouches from the bin and adds months or years of life.
A short fix can keep your pouch in service. Next, you’ll learn how to store and rotate them so repairs last.
Store Smart and Rotate
Where to keep them
Store pouches where they can breathe. Pick a cool shelf or a pantry drawer away from windows. Heat warps plastic and weakens seams. Don’t leave them on a hot car seat or above the stove. Avoid places that trap moisture.
Air and dry
Never stack wet pouches. Lay them open on a rack or hang them to finish drying. Small hooks work well. A peg rail, S-hooks on a towel bar, or Command utility hooks give you easy hang points. Over-the-sink dish racks also do the job. Give each pouch room. Air stops smells and stains.

Rotate like a pro
Treat your pouch stash like produce. Use the oldest first. Save newer, spotless pouches for travel or gifts. Keep a set for messy food and a separate set for dry snacks.
These small rules cut stains and stress. You will save time and money.
Keep them safe on the go
Don’t shove pouches with keys, knives, or loose pens. Those things slice seams. Use a small case for cutlery and sharp bits. Pack a thin cloth or napkin to wipe crumbs at the end of the day. A quick wipe keeps a pouch ready for the next use.
A little habit goes far. Hang them to dry. Rotate what you use. Separate the dirty from the clean. These moves keep your pouches strong and ready. Next, you will learn how to extend life even more by changing how you use and reuse them.
Extend Life Through Use and Reuse
Use liners for oily or staining foods
Slip a thin barrier inside when you pack oily foods. A beeswax wrap or a small silicone bag takes the stain. They keep grease off seams and bright prints. Use a cheap snack bag as a liner and wash the outer pouch less. For hot or runny food, double-bag.
Try these simple combos:
Repurpose worn pouches
When a pouch looks tired, give it new life. Cut and make small tools.
Recycle, donate, or upcycle
Check the maker first. Some brands run take-back or recycling programs for laminated pouches. TerraCycle partners with many makers. If a pouch still works, donate it. Food banks, shelters, and community kitchens often welcome clean, usable pouches.
For the rest:
If you must discard, choose the least wasteful route. A planned toss is better than a landfill impulse.
Buy with purpose
Match the pouch to your life. If you pack soups, buy heavy silicone (Stasher-style). If you stash snacks, thin but high-quality laminated pouches can work. Spend more on what you use most. A good pouch lasts. You will waste less.
Next, learn the last habits that keep them going.
Keep Them Going
You can make pouches last. Know them. Clean them right. Fix small faults fast. Store them dry and cool. Rotate what you use. Reuse and repurpose what you can. Small acts add up. They save money. They cut waste. They slow the churn of stuff. You hold the power. Start today.
Keep one pouch out of the bin. Mend one tear. Try a new habit. Teach a friend. Each small choice ends more waste. Keep going. Make it a habit. Track small wins. Celebrate fixes. Share what works. Live lighter. Repeat. Start with one pouch right now.


Haha I admit, I sing to my pouches when I scrub them. Doesn’t help but it makes chores entertaining. 😆
On a real note: keeping them fully dry before storage is everything. Mold is the sneaky enemy of ‘keep them going.’
Singing might improve outcomes via positive reinforcement — I’ll accept that method. And yes, dryness is key; a small silica packet in storage can help absorb leftover moisture.
I use a drying rack with clothespins to keep little pouches open while they air-dry. Works well.
Silica packets saved me once after a summer picnic. No mold, happy pouches.
I tried rotating my pouches like the article suggests — honestly felt weird at first (I’m weirdly sentimental about my snack bag lol) but it actually reduces wear. Also, dishwasher-safe reusable snack bags are convenient but put them on the top rack!
Top rack is the right move. And rotating prevents one pouch from getting all the stress/friction — glad the routine worked for you.
Same! Rotation here too. Kept my favorite pattern looking new longer. 🙂
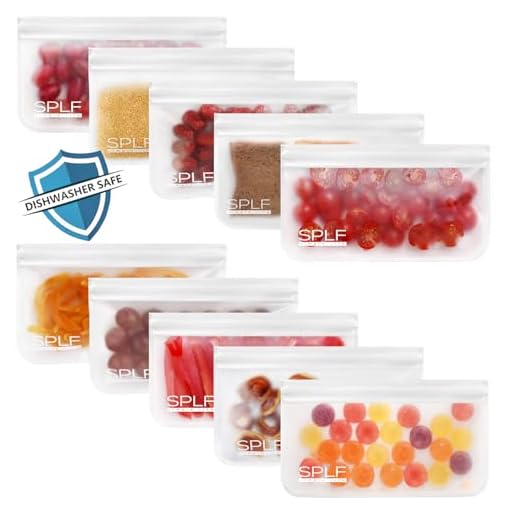
Quick question: anyone used the 10-Pack Dishwasher-Safe Leakproof Reusable Freezer Bags for freezing soups? I’m paranoid about leaks when defrosting. The article says ‘leakproof’ but… 🙃
I freeze soups in those. Tip: double-bagging once for extra protection, and always zip slowly to avoid pushing liquid out.
They work well for freezing soups if you leave headspace before sealing and lay flat to freeze. For defrosting, thaw in the fridge or place the sealed bag in a bowl to catch any possible drips.
Minor nitpick: article could show pictures of common zipper issues and how the 12-piece kit fixes them. Visuals would be clutch. Otherwise, thumbs up for practical, no-nonsense advice.
Great note — visuals would definitely help. We’ll look into adding step-by-step photos or short clips for zipper fixes in a future update.
Agreed. A quick before/after gif would make me feel less nervous about attempting repairs.
Love the ‘Fix It Before It Fails’ mindset. I keep a tiny pouch of repair stuff in my drawer: extra snaps, thread, and a mini no-sew kit. Saves money and stress. Also, pro tip: label canvas pouches inside with a fabric marker so you know which one is for toiletries vs snacks. Avoids cross-contamination.
Nice hacks — labeling is a simple habit that prevents mix-ups. Also keep separate sets for food and non-food use to be safe.
I do the labeling trick too — especially useful when kids help pack lunches.
Mini repair kit idea = genius. I might steal that. 😄
Positive vibe here: my kitchen is less cluttered since I started using the 10-Pack Dishwasher Safe Reusable Snack Bags and segregating pouches by purpose. Also, washable labels are a life-saver so my toddler doesn’t claim every pouch as ‘his’. 😂
Pro tip: use a small loop of ribbon as a tactile marker so you can grab the right pouch while juggling kids.
Toddler claim culture is real. I started color-coding for that exact reason.
Winning the clutter battle is huge. Washable labels are brilliant for family households — thanks for sharing!
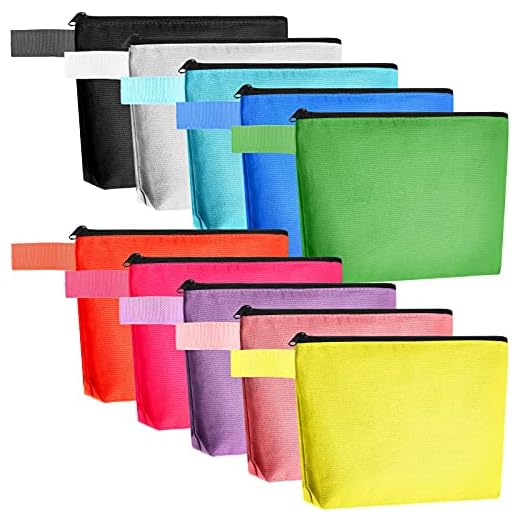
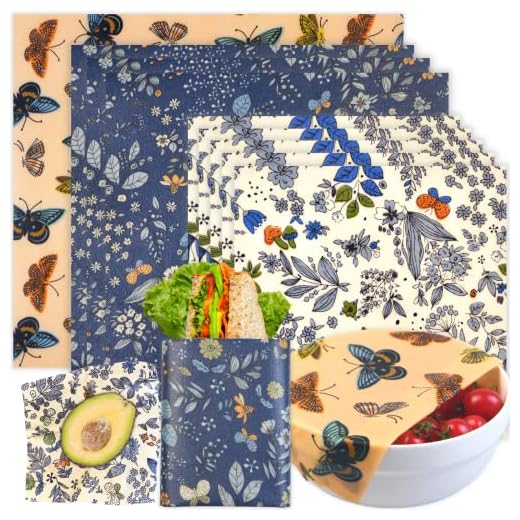
Great tips! I definitely underestimated the “Start with Care” part — I tossed a bunch of pouches in the dishwasher once and oops, some faded. I have the 10-Pack Canvas Makeup Travel Pouches (multi-color) mentioned and treating them gently really helps keep the colors. Also curious if anyone here has tried the beeswax wraps with sandwiches instead of pouches?
I once microwaved a beeswax wrap by accident 😬 Needless to say, not recommended. But yes, they’re fab for dry stuff.
I use beeswax wraps for dry/room-temp sandwiches and the silicone stand-up bags for anything moist. Saves a ton of plastic. Also, try air-drying the canvas pouches inside out to preserve color!
Thanks, Emma — glad the tip helped. The canvas pouches are more colorfast but heat and harsh detergents can still dull them. Beeswax wraps are great for sandwiches; they’re breathable and mold to shape, but for wet fillings I still prefer silicone or leakproof reusable freezer bags.
Skeptical but optimistic: I bought a 10-pack of silicone bags and a 9-pack of beeswax wraps because the article made me curious. Using both depending on the situation seems smart. One complaint — the article could add a quick chart comparing durability, wash method, and best uses for each product.
Yes to the chart. Also: silicone for soups, beeswax for sandwiches/cheese, canvas for cosmetics/cords.
Solid suggestion, Ben — a comparison chart is on our to-do list. Glad you’re experimenting with both; versatility is the point.
I keep a small notebook with which pouch does what. Old-school but it helps.
Constructive feedback: article could use a short troubleshooting flowchart — e.g., if zipper fails -> try cleaning -> try repair kit -> recycle responsibly. Still super useful though. Also, where do you recycle old silicone bags locally? Not all curbside programs accept them.
TerraCycle helped me with weird plastics. Also some community eco-stores accept silicone for repurposing.
Thanks, Daniel — great suggestion about a flowchart, we’ll consider that for an update. For silicone, check TerraCycle and some local recycling drop-offs; manufacturers sometimes offer take-back programs.
If nothing else, repurpose them as shuttered lunch-box liners or for craft storage before recycling.
Long rant incoming 😅
I used to toss everything in the sink and call it a day. After reading this I started treating things a bit nicer and actually fixed a zipper with the no-sew kit. One thing the article didn’t stress enough: the cost-per-use math. A $15 silicone bag that lasts 5 years vs $0.50 single-use bags every week? Game over.
But also please don’t judge me: I once tried to dry a canvas pouch in the dryer and it shrank. Lesson learned. 😂
Preach on the cost-per-use. I made a spreadsheet once, nerd level 100.
Love the math argument — cost per use convinces a lot of folks. And dryer = risky for many fabrics, so air-dry is safest.
I wish companies printed lifespan estimates. Would make decision-making easier. Also dryer shrinks are tragic but relatable.
Neutral/curious: does anyone have experience with long-term colorfastness of the 10-Pack Canvas Makeup Travel Pouches? I want them for cords and chargers but worried about dye transfer in storage boxes.
I use little cotton bags as liners when storing colored canvas. No dye transfer so far.
Canvas dyes vary. Recommend washing new canvas pouches separately once before first use (cold water, mild detergent) to reduce initial dye transfer. Store in breathable containers if concerned.
Okay long post bc I got excited reading this — hope that’s cool!
I’ve been switching to reusable pouches for a year and these sections hit home. “Know Your Pouch” is so important: my silicone bags (12-Pack 100% Silicone Stand-Up Food Bags) last forever if I avoid greasy sauces for a long soak. The freezer bags handled soups well. But canvas ones? Treat them like clothes — gentle wash, reshape while damp.
Also tip: for stubborn smells, a mix of baking soda and warm water in the pouch overnight works wonders. Anyone else have odor hacks?
Citrus peels + a jar of warm water overnight for a light scent. For strong smells, I add a tbsp of vinegar.
Activated charcoal sachets in storage containers help keep them fresh between uses. Works especially well for canvas pouches.
Great tip, Priya — baking soda does wonders. For silicone, white vinegar rinse followed by a baking soda paste scrub can remove lingering odors too.
Neutral take: the 9-Pack Organic Beeswax Food Wraps are cute and eco-friendly but they need more TLC than silicone pouches. If you’re lazy about hand-washing and air-drying, silicone is the better daily option. Canvas looks great but stains faster imo.
Agreed. For lunchboxes, beeswax is fine for cheese/bread, but I always pack dressings in a silicone bag.
Beeswax wraps = lifestyle choice, not quick-fix. I rotate 2-3 wraps and they’re fine, but I do have silicone for messy stuff.
Fair point — beeswax wraps are lower-maintenance for some uses but need gentle handling. The article tries to help readers pick the right material based on habits.
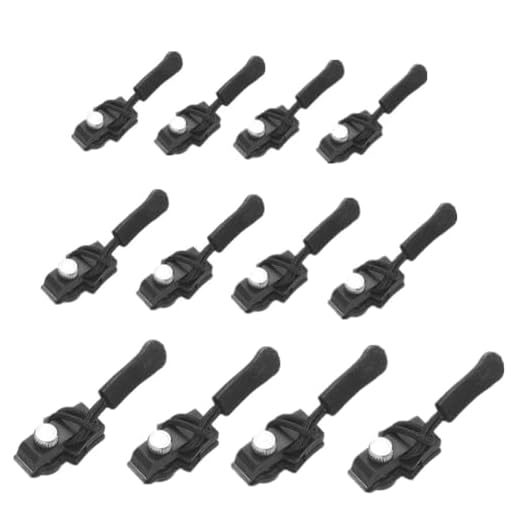
Short and sweet: the 12-Piece No-Sew Zipper Repair Kit saved me last month. Fixed a leaky snack bag in 10 minutes. If you use pouches daily, keep a repair kit handy.
It was the universal one listed in the article — fits most common pouches. Works well for my silicone and fabric zipper pulls.
Exactly — small repairs extend life a lot. The no-sew kits are a great quick fix without sewing skills.
Do you remember which kit model? I hate buying a repair kit that doesn’t fit my zippers.