
Choose Right. Keep Food Hot or Cold.
You want food that stays true. You want a jar that lasts. A vacuum-insulated food jar holds heat or cold by keeping air out. It keeps soup hot and salad crisp. It is simple. It is vital.
Watch four risks: heat loss, rust, leaks, weak lids. Know they ruin food and trust. You will learn clear steps. You will learn materials, seals, sizes, and care. Follow them and buy once. Use the jar for years. Keep food good. Save time and worry. Choose well, use it daily, and count on it for years.


Mason Jar Vacuum Sealer for Long-Term Food Storage
Why Vacuum Insulation Beats the Rest
The simple win: time and taste
You want hot that stays hot. You want cold that stays cold. Vacuum jars do that where other containers fail. Many good jars keep food hot for 6–12 hours and cold for 12–24 hours. That is enough for a workday, a hike, or a picnic. You skip reheating. You eat food that tastes like it did at home.
Real gains you feel every day
Think small. A piping hot soup at 1 p.m. instead of a lukewarm bowl. A crisp salad at 4 p.m. instead of wilted greens. That saves time and money. It cuts down on wasted food. It cuts down on extra cooking and microwave trips. It also keeps you healthier. Bacteria grow less fast in proper cold storage.
The trade-offs — honest and simple
Vacuum jars are not magic. They cost more than plastic. They weigh more. Some lids need care. Narrow mouths can be hard to clean. You must decide what you value most: weight and price, or food quality and convenience. Many people pick quality once and stop worrying about it.
Quick tips you can use now
Preheat or precool the jar for 2–5 minutes. Fill it near the top. Close the lid tight. Store it upright. Clean the seal after each use. These steps buy you hours of temperature control.
Next, we will peel back the lid and show how vacuum insulation actually works in plain terms.
How Vacuum Insulation Works in Plain Terms
The idea in one line
A vacuum jar keeps air out. No air means little heat moves by air. You stop most heat loss with a gap between two walls. That gap is nearly empty. That is the heart of the trick.
The three ways heat tries to get out
Heat moves in three simple ways. Conduction is heat passing through touch. Two walls cut that. Convection is heat carried by moving air. A vacuum stops that air. Radiation is heat that travels as light and infrared. A shiny inner layer reflects that back. Each part plays its role. Together they slow all heat paths.
What to check when you inspect a jar
A quick field test
Pour near-boiling water in. Cap it and wait an hour. Touch the outside. If the jar stays cool and the lid stays firm, it is doing its job. For cold tests, use ice water and try the same check.
Next, you will read how materials and build matter — which steels, coatings, and design choices make that vacuum last.
Materials and Build: Steel, Coatings, and Strength
Which steel lasts
You want stainless. Most good jars use 18/8 stainless. It is strong. It resists stains and tastes. Makers sometimes call it 304. For tougher use — salt, sea air, acidic soups — 316 holds up better. It costs more. You pay for that extra rust resistance.
Wall thickness and weight
Wall thickness matters more than specs on a box. Thin walls dent. Dents kill vacuums. A solid jar feels weighty in your hand. If it flexes, it will fail sooner. Choose heft over flash. A jar heavy for its size usually has thicker steel and better long-term durability.
Coatings, chips, and rust
Coatings hide the metal. They protect it — until they chip. Powder coat or baked enamel lasts. Cheap paint flakes. Once paint chips, rust can start at the nick. Silicone sleeves cushion drops. But sleeves trap dirt. Inspect the paint edge near lids and handles for hairline chips.
Welds, lids, and weak spots
Welds fail before walls do. Look at seams where the body meets the base. Check handle mounts. Check lid threads and gasket channels. Smooth, even welds mean care. Rough, lumpy joints mean shortcuts. A lid that rattles, or a gasket that sits loose, invites leaks and corrosion.
Simple tests to do now
You will win in the long run if you choose solid steel, snug joins, and honest coatings.
Size, Shape, and Capacity: Match the Jar to Your Routine
Size guides use
Think of size as a tool. Pick one that fits your meal, not your wish. A 12–16 oz jar suits a work lunch. A 20–24 oz jar fills a big soup or stew. Smaller jars heat faster to eating temp. Bigger jars hold more total heat. But more surface cools faster at the top.
Capacity and heat facts
Heat loss tracks surface area. A wide, shallow jar gives you more top surface. A tall, narrow jar keeps heat deeper. If you want longer heat for liquid meals, choose taller over wider. If you want to eat easily, choose wider.
Shape and mouth
A wide mouth lets you spoon, pour, and scrub. It also speeds cooling at the surface. A narrow mouth saves bag space. It keeps heat in and spills less. For soups, wide mouth is kind. For coffee on a hike, narrow mouth wins.
Weight and packing
Weight matters. You will notice a heavy jar on a long walk. Thicker steel lasts. It also adds pounds. If you pack light, go slim. If you pack meals for a family, choose bulk jars and a good carrier.
Quick rules to choose
Sample use cases
Pick the size that matches how you eat. Pick the shape that fits how you move.
Lids, Seals, and Cleaning: Keep the Vacuum True
Gaskets, threads, and lid types
The lid makes the jar work. A poor lid ruins a good jar. Look at the gasket first. Silicone gaskets are common. They bend and seal. Rubber can crack with heat. Some lids have a molded seal you cannot remove. Threaded screw lids seal well. Push-and-lock or flip-lock lids add convenience. Locking lids can leak less in a pack. Know what your jar uses before you buy.
Fast leak tests you can do
Fill the jar to the brim with water. Close it as you would on the go. Invert and hold for 10–20 seconds. Shake gently. Watch for drips. Put a paper towel under the lid joint if you want a clear read. Open the lid and listen. A soft hiss can mean a good vacuum hold. A loud pop can mean trapped pressure from a bad seal.
Cleaning without damage
Hand wash when you can. Use warm water and a soft brush. Avoid the dishwasher for lids and gaskets. Heat and harsh cycles shrink or warp seals and fade coatings. For odors use baking soda and hot water or a 1:1 vinegar soak for 15 minutes. Rinse well.
Drying and gasket care
Remove the gasket after washing. Dry it by hand or air dry on a towel. Dry threads and lid grooves with a clean cloth. Check gaskets often. If a gasket is flat, brittle, or has cuts, replace it. Many makers sell spares. Keep one spare in your kit.
Quick checklist to keep lids tight and seals sound
Longevity, Warranties, and What to Look for When Buying
Look for real warranties and spare parts
You want a jar that lasts. Look for a clear warranty. One year is common. Five years is better. Lifetime is best — if it means the company actually repairs or replaces items. Check if they sell spare lids, gaskets, or caps. Ask if they have a service center. Brands like Stanley or Zojirushi often support repairs. That matters on day three and year three.
Read reviews for the long haul
Don’t judge by day-one photos. Scan reviews aged six months, one year, two years. Seek patterns. Do lids crack? Does paint chip? Do seals fail after a season? A handful of bad months does not ruin a model. A steady drum of the same fault should warn you.
Watch for companies that fix things
Good makers post care guides and parts pages. They answer emails. They ship gaskets. They replace lids. That shows they expect their jars to live long lives. You want that after a dropped hike or a dishwasher mistake.
Red flags
Quick buying checklist
You now have concrete signs to judge lifetime value and avoid junk. Turn the page and close the deal with confidence.
Buy Once. Use Often.
A good vacuum jar saves you time and trouble. Pick by function, build, and care. Test lids. Inspect materials. Keep parts clean and dry. Use it hard. Let it earn its keep.
Choose one that fits your life. Read warranties. Favor steel and tight seals. If it survives daily use, it will reward you. Buy with care. Then use it without fear. Store it dry. Replace worn gaskets. Learn simple fixes. Keep a spare lid or seal. Small acts keep vacuum strong. In time the jar pays you back in saved food and calm. Buy smart.


So the jar is a vacuum and magic happens? 😂
Serious note: anyone actually tested these against a cheap insulated container? I feel like marketing is 80% of the heat claim.
Quick review from a mom of a very picky kid: I bought the Pawtong 12oz Kids Insulated Vacuum Food Jar and it’s been fantastic — fits small hands, keeps soup warm until lunch, and the colors haven’t faded.
Cleaning tip: remove the silicone seal and soak in warm soapy water, then air dry. The article’s lid section saved me from causing mold once lol.
Question for others: do kids’ jars generally have shorter warranties than adult ones? Kinda worried about longevity.
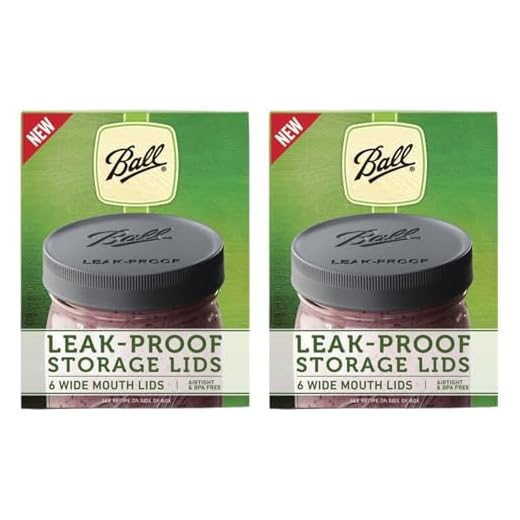
Also, curious if anyone uses the Ball Leak-Proof Wide Mason Jar Lids for pantry storage instead of the FERMALIFE jars? Thoughts?
Adding: If you need dishwasher-safe, double-check product specs. Some kids’ jars say hand-wash only which can be a pain.
Pawtong lasted a year for us — the paint wore but vacuum still works. Warranty was 6 months though. YMMV.
I used Ball lids for dry snacks — cheap and handy. But for long-term pantry stuff (flour, beans) I’d spring for a proper vacuum jar like the FERMALIFE.
Great practical tips, Sarah. Warranties on kids’ jars vary — Pawtong often has a shorter manufacturer warranty (check the product page), but many sellers offer returns if defects show up early. For pantry storage, Ball lids are fine for dry goods; FERMALIFE borosilicate vacuum jars are better if you prioritize airtight vacuum sealing and want glass durability.
My kid destroyed a ‘durable’ plastic lid in one week. Pro tip: go stainless when you can, or at least glass with a protective sleeve.
I reuse Ball lids for canning and short-term storage, but they’re not a long-term vacuum solution. The FERMALIFE jars are nicer for keeping things fresher longer.
Wanted to say the section “Buy Once. Use Often.” really hit home. I’ve cycled through cheap jars that failed in months — switched to a Goodful Double-Wall Stainless Food Jar, 16oz and it’s lasted a year with daily use.
A few random thoughts:
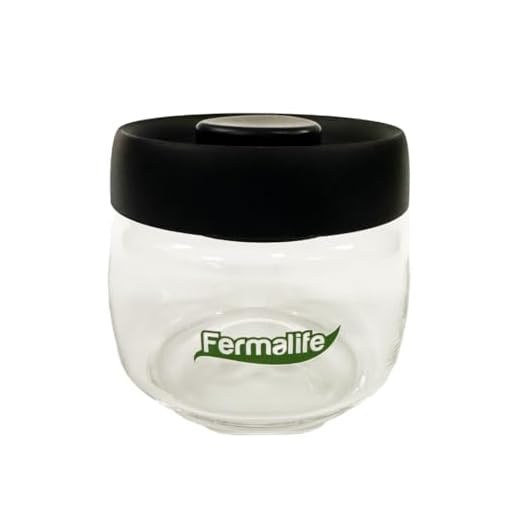
– Glass vacuum jars (FERMALIFE) look gorgeous on the shelf but I’m paranoid about dropping them 🤦
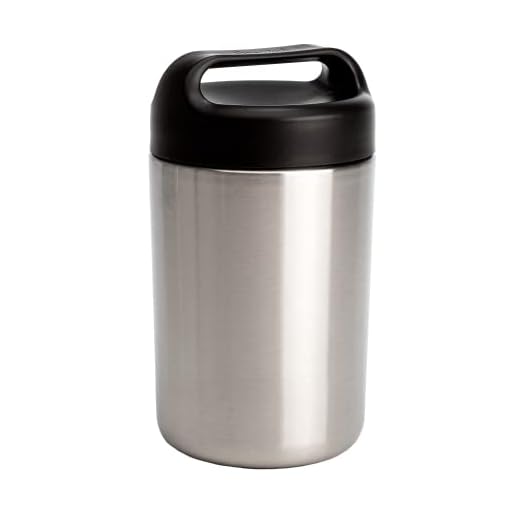
– Thermos Stainless King with Dual Inserts seems ideal for people who like separation (salad + dressing) — wish more brands offered this.
– Ball Wide lids are cheap and functional, but not the same as a real vacuum seal for long-term freshness.
If anyone has long-term photos (1–2 years) of wear on Thermos or Goodful, please share — curious how coatings hold up.
I’ve had a Goodful for about 18 months. Exterior paint chipped a bit at the top rim from my keys rubbing in the bag, but vacuum performance is unchanged.
Totally — photos are super helpful. We might feature reader-submitted wear-and-tear in a follow-up. If you send pics, include usage notes (daily vs occasional).
FERMALIFE jars look great for pantry display. I use them for spices and small stuff — put a silicone sleeve on them for travel safety.
I had a Thermos for 3 years. Scrapes on the outside but still seals fine. Worth the slightly higher price IMO.
Loved the breakdown on vacuum insulation — finally something that explains it without sounding like a physics lecture.
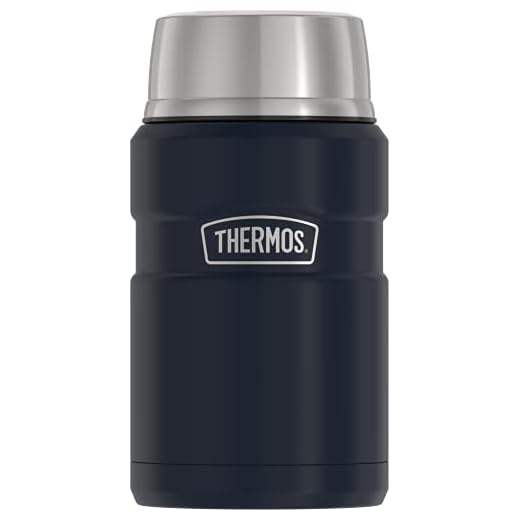
I ended up getting the Thermos Stainless King Food Jar, 24 Ounce after reading the parts about materials and durability. Keeps my curry hot for hours and the lid seal is actually easy to clean (who knew?).
Pros: sturdy, good heat retention, the spoon version looks cute for lunches.
Cons: a bit heavy if you’re packing it every day, but worth it for the warmth.
Would like a follow-up on abrasion-resistant coatings — how they hold up in a backpack over time.
Totally agree about the weight. I swap to the 16oz Goodful when I want lighter bags — not as hot for as long, but still decent.
I have the Dual Inserts version — great for separating rice and curry. The inserts make leftovers less messy. Only gripe: seals are a pain to reseat sometimes.
Thanks for sharing, Maya — glad the article helped! On coatings: look for descriptions like “scratch-resistant” or “matte powder coat” and check user photos for real wear over time. Stainless inners tend to be the most durable.
comment
If you meant to ask about warranties: check the product page and register your Thermos/Goods for extended coverage when possible. Many brands offer at least a year.
Good article! Quick note: the section on lids and seals is gold. I swapped to Ball Leak-Proof Wide Mason Jar Lids for dry pantry stuff and the seal is way better than my old twist lids.
One thing I’d add: a tiny brush helps get into the grooves of Thermos lids — saves a lot of future stink.
Curious if anyone tried the Stainless King with spoon and lost the spoon in the first week? Asking for a friend 😂
Haha finally, someone else to blame for the missing spoon. Mine lives in my work bag now so it doesn’t vanish into the kitchen abyss.
Thanks, Diego — agree on the brush tip. For the spoon: Thermos usually tethers it pretty well but if it’s removable, consider a small carabiner or a designated pouch so it doesn’t go missing.