
Clean Your Fryer. Fry Like a Pro.
You want CRISP fries and SAFE oil. This guide shows simple steps, done in order. Save time. Stay safe. Follow clear tasks to drain, scrub, sanitize, and refill. You will cut smoke, smell, and fuss and fry like a pro.
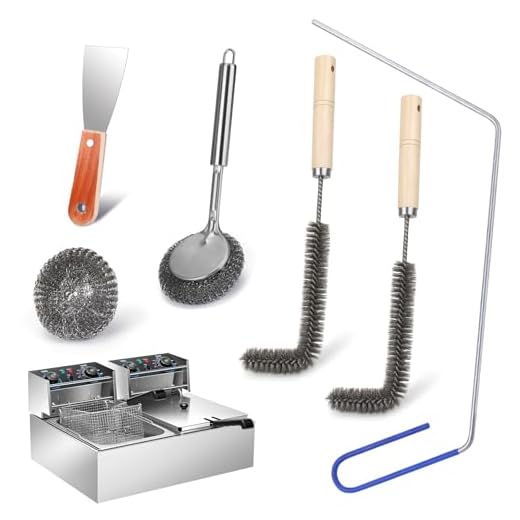
What You Need

Clean a Commercial Deep Fryer Like a Pro: Quick
Cool and Drain the Oil
Wait — don’t toss the oil yet. Reuse, strain, or bin? Your call.Turn the fryer off. Unplug it. Let the oil cool. Do not rush. Hot oil burns. Let solids settle to the bottom. Wait until steam stops rising.
Use a heatproof jug or jar to drain. Strain the oil through a fine sieve or cheesecloth if you plan to reuse it. Pour slow. Steady hands matter.
Seal and discard oil that smells sour or foams. Do not pour oil down drains. Put used oil in a sealed container. Write the date on the jar if you save oil. Take it to a recycling point or wrap it in dry absorbent and trash it.

Take It Apart
Like surgery for your fryer. What comes off first? Start simple.Remove the basket and any racks. Lift out the oil tank if it is removable. Take off lids and filters. Check the manual for the heating element. If it detaches, remove it now.
Lay each part on a towel. Keep small screws in a bowl. Do not force parts. Note where each part goes. Take a photo if you feel unsure. For example, snap the underside of the lid so you see the screw holes when you reassemble.
Handle electric parts with care. Keep them dry.

Scrape Off Gunk; Soak for Ease
A little elbow grease now saves hours later. Soak stubborn bits away.Use a plastic spatula to scrape out crumbs and crust.
Toss loose bits into the trash.
Fill a sink or tub with hot water and dish soap.
Add a bit of degreaser for heavy grease.
Soak baskets and lids for at least 20 minutes.
Scrub with a non‑abrasive pad after soaking.
Rinse parts well under hot water.
Repeat the soak and scrub for stubborn carbon.
Make a paste of baking soda and water for tough spots and rub gently.
Keep scrubbing short.
Let the soap do the work.
Imagine a fry night where crumbs hide under the basket hinge. Scrape them free with the spatula.

Deep Clean the Tank and Element
Don’t short the fryer. Clean the tank like a pro.Wipe loose grime from the tank.
Check your manual. Fill the tank with hot water and a few drops of dish soap if it allows.
Swish the water to lift oil and crumbs.
Brush corners and seams with a soft brush.
Avoid submerging fixed electric parts.
Heat a little warm water in the tank to melt stuck grease, then scrub with the brush.
Rinse the tank until the water runs clear.
Wipe the heating element with a damp cloth.
Avoid letting water touch exposed wiring.
Dry each area with towels.
Air dry to be sure.
Imagine heating a bit of water to loosen the grime, like thawing butter before you scrape it.
Sanitize and Dry Every Part
No smell. No bacteria. Clean fryer. Crisp fries ahead.Mix a mild sanitizer: one part white vinegar to four parts water or follow a food‑safe sanitizer label.
Wipe all food-contact parts with the solution.
Let the solution sit for one minute to kill germs.
Rinse if the sanitizer requires it.
Dry parts with clean towels.
Stand parts upright to air dry fully.
Avoid moisture. It breeds oil breakdown and odor.
Think of a wet basket left overnight; the oil turns sour fast.
Check seals and gaskets.
Replace any cracked or brittle parts.
Wait until every part is bone dry before you reassemble.
Dry hands and work surfaces too.

Refill Oil, Test, and Keep It Clean
A clean fryer fries better. One test fry proves it. Then set a plan.Reassemble the fryer once all parts are dry.
Pour fresh or well‑strained oil to the fill line.
Plug in the unit.
Heat to the fry temperature you use.
Watch for smoke or odd smells.
Try a single small test fry — a french fry or a bit of batter.
Taste it.
Drain and repeat cleaning if it tastes off.
Wipe the exterior and knobs with a damp cloth.
Record an entry: date, oil type, hours run, and cleaning done.

Final Crisp
Clean well. Dry fully. Refill and test. Keep a simple log. Fry safe. Fry good. Try this now today. Share your results. You will save oil, time, and mess. Post a photo now. Inspire others to fry like a pro.


Couple of things I experimented with after following the guide:
1) After scraping gunk I ran a hot water + baking soda rinse before the deep clean.
2) For the element, I used a soft toothbrush and CLR for mineral build-up (just a quick dab).
3) Refilled with fresh oil and ran a short test fry — smelled clean, cooked fine.
Would love to know if CLR is safe on all elements or just certain metals?
Nice experiments — baking soda is great for neutralizing odors and mild scrubbing. CLR (or similar descalers) can be fine for mineral deposits but check the element’s material: stainless elements usually tolerate it, but aluminum or coated elements might not. Always test on a small area and rinse thoroughly.
Thanks — my element is stainless, so I’ll stick with it but do a tiny patch first. Appreciate the guidance!
I used CLR on stainless parts with no issues. If in doubt, call the manufacturer — but many folks in this thread had success with careful use.
Lol, I thought ‘take it apart’ meant ‘try to open it with brute force’ until I read the sub-steps. The photos saved me.
Pro tip: keep all tiny screws in a jar so you don’t lose them. Also, use a soft brush on the heating element — don’t be too aggressive.
Exactly — gentle on the element. And love the jar trick for screws, such a small thing but it prevents a headache later.
I once lost a screw inside the cabinet and heard it rattle for weeks. Jar = best practice. 😂
Short and sweet: this guide is gold. Cleaned my fryer in 30 mins (including soak time) and no burnt oil smell anymore. Worth bookmarking!
Love to hear that — thanks Maya! 30 minutes is a great turnaround.
Right? The step-by-step format makes it actually doable. I used a small spatula to get stubborn crumbs out — lifesaver.
Question about sanitizing: the guide mentions sanitizing and drying every part.
Is a commercial food-safe sanitizer necessary, or will a bleach solution (properly diluted) do the job?
Also, do rubber gaskets handle bleach ok? I worry about degrading seals.
Any specific concentrations or contact times recommended would help.
Good concerns. A diluted bleach solution (1 tablespoon bleach per gallon of water) is effective for sanitizing hard surfaces; rinse thoroughly after and let parts air-dry. Avoid soaking rubber gaskets in bleach for long periods — it can degrade them. For gaskets, milder sanitizers or hot soapy water + thorough rinse usually suffice. Let sanitizers contact surfaces for at least 1 minute for effectiveness.
Also, if you ever see cracking or warping on seals after a few cleans, replace them — cheap insurance vs leaks or failures.
Thanks — super helpful. I’ll switch to milder sanitizer for the gaskets and reserve bleach for the tank. Appreciate the contact time tip.
I use a commercial food-grade sanitizer at the restaurant where I work. It’s gentler on rubber parts and designed for quick contact times. If you’re cleaning at home, dilute bleach for hard metal parts but not rubber.
One more — always check the manufacturer’s manual for recommended cleaners. Some warranties get voided by harsh chemicals.
Awesome guide — super practical! I followed the steps yesterday and my fries actually tasted like restaurant fries again.
I especially liked the tip about soaking removable parts overnight (saved me scrubbing for hours).
One thing I did: used white vinegar in the final rinse to cut any leftover smell — worked great.
Minor hiccup: forgot to unplug the fryer before draining (😬) so note to self: safety first!
Thanks for the clear steps, kept it simple and not too technical.
Oof that unplug reminder is a life-saver. I almost drained mine while it was still plugged too — learned the hard way. 😅
Thanks Laura — glad it worked out! Good call on the vinegar, it’s a nice natural deodorizer. And yes, unplugging is non-negotiable safety-wise.
Totally agree on the vinegar trick. I use a 1:1 water-vinegar mix for the final wipe. Smells gone and no funky aftertaste.
Helpful steps but curious: how often should I do a full deep clean versus just skimming and filtering the oil? The guide mentions ‘keep it clean’ but not a timeline.
I cook a lot on weekends, so want to balance effort vs oil life.
I do the quick skim each day and full clean every 10 days. My oil lasts longer and my food tastes better. If you’re frying breaded stuff, clean more often.
Agree with Nate. Another sign: if oil darkens quickly or foams, change it. No point risking flavor for a few extra uses.
Also tip: keep a log (even a sticky note) of oil changes and deep cleans — helped me track when to act.
Great question. For frequent weekend use, skim and filter after every use and do a full deep clean (steps 2–5) every 1–2 weeks, depending on how much batter or crumbs end up in the tank. If you notice smell or excessive foaming, do a deep clean immediately.