
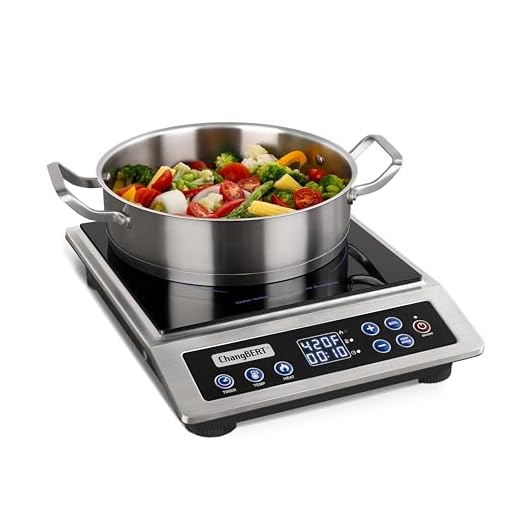
Quick Start: Install and Care for Your Countertop Burner
You will set up your countertop burner with short clear steps. You will pick a safe spot. You will prepare the surface and power. You will install it cleanly. You will use it safely. You will clean and maintain it.
What You Need

Ovente Ceramic Countertop Burner – First Try, Honest Review & Demo
Unpack and Inspect the Unit
Found a dent or missing part? Don’t shrug it off.Open the box on a clear table. Inspect the unit and parts right away. Match each part to the list in the manual. Test knobs and handles. Turn them. Feel for play or wobble.
Check these items:
Dents, cracks, or bent plates
Loose or missing screws and knobs
Broken or frayed cords (electric)
Gas fittings, seals, or obvious leaks (gas models)
Manual, mounting hardware, and accessories
Read the model and serial label. Verify voltage or gas type. Example: you ordered 240V electric; the label reads 120V — stop. Stop and call the seller or maker if anything looks wrong. Do not use a damaged unit. Read the quick safety notes. Know what you bought before you mount it.

Choose the Right Spot
Think small move, big safety — where will it live?Pick a flat, stable spot. Keep 6–12 inches from walls and any flammable items. Avoid overhanging cabinets that trap heat or steam.
Use a heat-resistant counter. Leave room for pans and for handles to point safely away from edges. Place near a GFCI outlet for electric units. Plan a safe, code-compliant gas line and venting for gas models.
Keep the burner away from sinks when you can. Think of how you cook. Place the burner so you can reach the controls with one hand. Clear sight and good light help you cook safe.
Key points:

Prepare the Surface and Power
A flat surface beats a shaky start. Trust me.Clean the counter. Remove oil and crumbs. Wipe the area dry. Place a heat pad or trivet under the burner if the manual recommends it. Use a level to set the unit flat. Try a bubble level or your phone’s level app.
Use a dedicated outlet for electric models. Do not use thin extension cords. Plug the unit straight into the wall.
Use the correct connector for gas models. Hand-tighten fittings, then snug once with a wrench. Test joints with soapy water. Watch for bubbles. Fix any leak before you turn on the gas.
Check induction specs. Use only compatible pans, such as magnetic stainless or pans labeled “induction-ready.”

Install the Burner
You can do this. One clear step at a time.Set the burner in place. Fit any mounting clips per your manual. Plug in your electric model. Connect your gas line only if you are certified. Hire a pro for gas work if you are not.
Turn power on at low heat. Watch the first use. Listen for a steady flame on gas models. Imagine a steady blue flame. Watch the element glow or the indicator light on electric models. Boil a cup of water as a short test.
Check for wobble, odd smells, or error lights.
Turn off and wait. Fix issues before you cook full meals.

Everyday Use and Safe Operation
Work smart, not hard — avoid the common mishaps.Preheat only as needed.
Use pans that match the burner size. For example, place a 10‑inch pan on a 10‑inch burner.
Clean and Maintain for Longevity
Keep it clean. It will last longer. No excuses.Protect your unit. Do small tasks now to avoid big fixes later.

Start Safe, Cook Well
Install with care. Use common sense. Clean with skill. Do this and your burner will serve you well for years. Try it. Tell others what you made and how it went. Share your results and start cooking today now, too.


This guide was super thorough. I especially loved the step-by-step for “Unpack and Inspect the Unit” — found a tiny scratch during unboxing and the checklist saved me a return hassle.
A couple of things I did differently:
– I put a silicone heat pad under the burner (extra protection).
– When installing, I used a small level to make sure it wasn’t slightly tilted (wouldn’t have noticed until pans slid)
Also, tiny nitpick: there are a few grammar hiccups in the safety section, maybe an edit pass would help. Otherwise really useful 😊
Ben — omg that sounds terrible 😂 Glad you survived. Also, admin, if you add the silicone pad tip, maybe note material compatibility (some pads melt at high temps).
Appreciate the feedback, Maya — we’ll proofread that safety section and clarify the inspection checklist. Love the silicone heat pad tip, we might add it to the ‘Prepare the Surface’ section.
Good catch, Maya — we’ll include a note about checking the heat resistance of any protective pads.
Leveling is clutch. I once had broth pool on one side of a pan because the burner was off by a hair. Learned the hard way 😂
Hilariously, my cat thought the burner was a new bed. Pro tip: keep pets away during first use — they will investigate EVERYTHING. 😼
On a serious note, the cleaning section is spot on. Took my stubborn stains out with the recommended paste. Still, would love a video walk-through for the tougher scrubbing bits.
Also, microfiber cloths are your friend for everyday wipe-downs. Less scratching than rough sponges.
Thanks Nancy — I used my old green scrubby once and regretted it. Learned the microfiber lesson the hard way 😅
Good tip, Nancy. We’ll add microfiber and scrubber warnings to the cleaning steps.
Ha — cats do love warm spots! We’re working on video content; a demo for the ‘Clean and Maintain for Longevity’ section is on our roadmap.
Agree on the video. Watching someone do the scouring technique makes it way easier to mimic without damaging the finish.
Got mine set up in less than an hour thanks to the guide. One tip: keep a flashlight handy when checking the underside during ‘Unpack and Inspect’ — small screws hide in shadows.
Overall: thumbs up 👍
Also use a magnetized screwdriver if you’re dealing with tiny screws — less chance of losing them.
Excellent tip, Marcus — we’ll add a reminder to inspect the underside with good lighting and a flashlight if needed.
Quick, clear, no nonsense. I liked steps 4 and 5 a lot. One question: can the burner be used under a wall-mounted cabinet if there’s good clearance?
Thanks Lucas. That depends on local codes and the cabinet clearance — generally you want ample vertical clearance and no flammable materials directly above. We recommend checking the manufacturer’s clearance specs and local building/fire codes.
If it’s just a small microwave above it, check the venting — sometimes the heat/steam can damage cabinetry over time. I wouldn’t recommend enclosed cabinets directly over an always-on burner.
Wow this was FUN to read—like a mini adventure guide but for kitchen appliances. A few real notes from my install:
1) Make sure the surface is level; I used shims under the feet to prevent wobble.
2) The guide’s ‘Start Safe’ section is gold — I kept it nearby when testing for the first time.
3) I accidentally left a sticker on the bottom and smelled plastic for a minute. Oops, rookie move. 😅
Also: why do manuals always use inches OR cm but never both?? tiny rant over. 😆
Love the adventure analogy, Noah. We’ll add a reminder to remove all stickers/film before first use and include both metric and imperial units in the next revision.
Maya — good call, that’s exactly what I did after panicking for a second. Works like a charm.
Haha the sticker smell is the worst. I make a point to do a ‘first run’ with just water in a pot to burn off residues — it helped me.
About units: manufacturers sometimes include both but editors trim for space. Still annoying — every guide should show both.
Short and sweet: great guide. Installed in 20 minutes, cleaning instructions are easy. My only gripe is the photos — some angles could be clearer 🤷♀️
Agree on photos. Step 4 had a confusing angle for me until I re-read it. A close-up would help.
Thanks, Sofia. Noted about the photos — we’ll aim for more detailed installation angles in the next update.
I installed mine following the guide but ran into an issue: the burner kept tripping the breaker when I turned it on at max. Ended up moving it to a dedicated circuit.
If anyone else has old wiring, consider checking your breaker capacity before installation. Saved me a day of troubleshooting.
Thanks for sharing, Oliver. That’s an important practical tip — we’ll add a note about circuit capacity and when to consult an electrician in ‘Prepare the Surface and Power.’
If you’re not comfortable checking circuits, definitely call an electrician. Better safe than fried wiring.
Yep, I had the same issue in an older apartment. Bought a power meter to test draw first — helpful to see how much it actually pulls at different heat settings.
Helpful guide overall but a couple of safety concerns I wanted clarified:
– The guide says “keep flammables away” but doesn’t define how far. Is 12 inches okay?
– Also, the maintenance schedule: how often should you deep clean versus quick wipe? It felt vague.
Would appreciate a clearer timeline in the ‘Clean and Maintain’ section.
I do a deep clean every 2-3 weeks because I cook a lot, but a wipe after every use prevents greasy buildup. YMMV.
Thanks, that helps. A monthly schedule sounds reasonable — would make me more likely to stick to it.
Good questions, Emily. We’ll specify recommended clearances in inches and cm (typically at least 12-18 inches vertically and side clearances per manufacturer). For maintenance, quick wipe after each use and a deeper clean monthly (or sooner if you cook frequently) is a solid baseline — we’ll add this as a clear timeline.
Nice quick start — saved me a bunch of time. I followed the ‘Choose the Right Spot’ tips and moved mine away from the backsplash like it said. Burner fired up on first try. 👍
One small thing: the guide could mention cord length more prominently — I almost placed it too far from an outlet.
Same here — I had to use an extension (not ideal). Maybe include recommended minimum outlet distance from the edge?
Thanks, Daniel — great point about cord length. I’ll add a note to the Quick Start and the ‘Prepare the Surface and Power’ section so others don’t run into the same issue.
Glad it worked out! I keep a small cable organizer under the counter to avoid the cord tangling. Works well with these burners.