
6-Step Guide to Picking Stackable Meal Prep Containers for Your Meals
You want neat meals and less waste. This guide shows six clear steps. You pick containers that match your day, your food, and your kitchen. Read, test, and buy with confidence. Start now and make meal prep a habit daily.
What you need
Top 5 Reusable Meal Prep Containers — Ultimate Buyer’s Guide
Know Your Meal Plan First
What meals will you stack? One box does not fit all.Start with your food. Are you packing soups or salads? Hot lunches or chilled snacks? Do you prep daily or weekly? Pick containers that match the food type.
Choose by food:
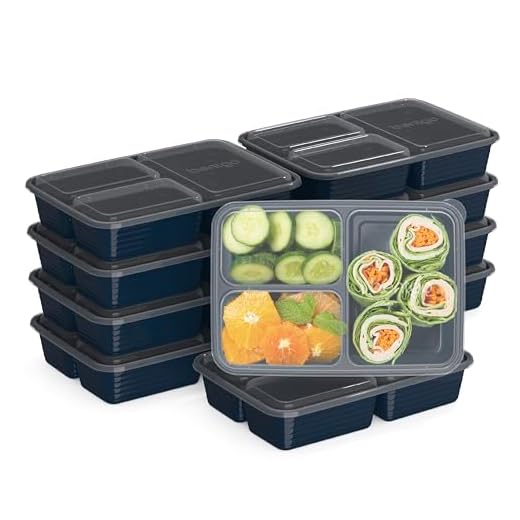
Measure your portions. Count your meals. Example: if you make five lunches, buy five 700–900 ml stackable containers. If you freeze meals, add 10–20% headspace. Match volume and frequency. Pick containers that fit your plan.

Pick the Right Material
Glass or plastic? One choice lasts and one costs less. Know which.Choose by use. Match material to how you cook, carry and store food.
Pick glass if you want heat resistance and no stains. Glass is heavy. It goes in the oven and microwave. It will not warp. Example: make lasagna in a glass tray, reheat and serve.
Pick stainless steel if you want light strength and cold retention. It lasts. It often won’t go in the microwave. Example: pack salads or chilled grain bowls for work.
Pick plastic if you need light, cheap and shatterproof gear. Buy BPA-free, food-grade plastic. Check freezer and microwave ratings.

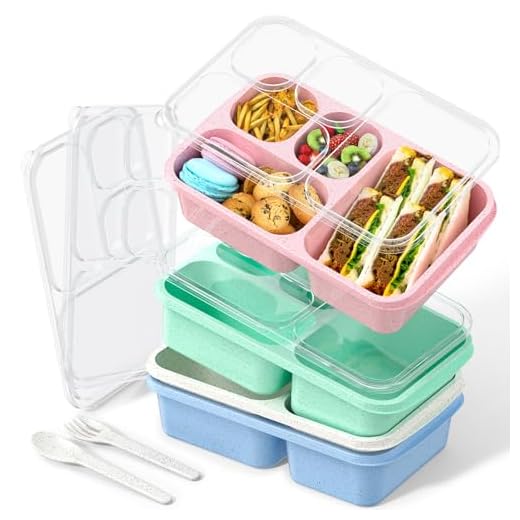
Choose Shape and Stack Design
Squares save space. Round keeps lids neat. Which camp will you join?Pick the box shape that saves space.
Choose square or rectangular boxes to pack tight in your fridge and bag.
Avoid round bowls when you need compact storage; they nest, but leave wasted gaps.
Look for uniform heights so stacks stay level.
Find lids that lie flat. Flat lids let you layer boxes in coolers or on shelves without slips.
Seek interlocking or nesting designs so boxes stay put.
Test by stacking three empty containers at home. If they wobble, keep looking.
For example, pack three square 2-cup boxes into your lunch bag. They sit tight. They do not tip.

Seal and Lid Features You Can Trust
A loose lid ruins a week of meals. Don't gamble on cheap seals.Test the seal. Fill a container with water and a spoon of dressing. Close it. Shake and tip it. Watch for drips.
Look for silicone gaskets and tight locks. Snap locks add insurance. Vented lids let steam escape when you reheat.
Check vents before reheating. Do a leakage test for dressings and stews. Buy spare lids if the brand sells them. Trust a tight lid to keep food fresh and your bag clean.

Size, Compartments and Portion Control
Stop guessing portions. Make your macros obey.Pick sizes that match your portion goals. Use the right box for the right meal. Keep most boxes the same size so they stack neat. Use compartments if you hate mixing. Fit sauces in a tiny cup. Use removable dividers to shift from salad to pasta.
Label volumes in cups or ml for quick portion math. Mark a box “250 ml / 1 cup” so you know servings at a glance. Test with real food.
Test, Care and Buy Wisely
Buy once. Use daily. Keep them clean and they will last.Try one sample before you buy a full set. Microwave a cup of water in your box for 1–2 minutes to spot warping.
Freeze a wet meal overnight to test the seal and joint stress. Wash lids daily. Rinse and dry seals by hand or use the top rack.
Check for stains, smells, and warped rims after each use. Buy warranty-backed brands when you can. Consider starting with a small set and add pieces that match.
Replace lids when they lose their fit. Care for parts and you cut long-term cost.

Ready to Stack Your Life
Use these six steps. Match containers to your meals. Test them. Care for them. Stack smart. Eat well. Try it now. Share your results and tips with others. Start today and make meal prep work that fit your life well.


Nice guide — really thorough! A few things I loved:
1) The focus on knowing your meal plan first is spot on.
2) I personally prefer glass for reheating, but the guide’s breakdown of materials helped me see when plastic makes sense.
3) Would’ve loved a quick checklist at the end for “buying day” decisions.
Little thing: your tip about stack design saved me from buying awkward trapezoid containers once 😂
Thanks Sarah — great idea about a one-page checklist. I’ll add that to the next update!
Totally — and pro tip: label lids with masking tape for a week to figure out your true size needs before buying a big set.
Agree on the checklist. Also, if you go glass, look for tempered/borosilicate — reheats way better and less likely to crack.
This guide sold me on stackable — my cabinets used to be Tetris nightmares. Now they’re slightly less chaotic. Still working on the socks though.
If it’s any consolation, a sock drawer organizer is only like $7 and 100% worth it.
Ha! Glad the guide helped with cabinet Tetris. Socks are a different kind of organization puzzle 😉
Lid seals: test them in the sink before you trust them in a backpack. I learned that the hard way. 😅
One of my lids looked leakproof but still managed to drench my laptop. So yes — the guide’s advice to test is gold.
Same here. Also pay attention to the gasket — silicone gaskets are replaceable on some brands, which I appreciate.
Oh no! The sink test is in the guide for a reason — glad it helped you remember to try it first (but sorry about the laptop).
Loved the material pros/cons section. A couple of notes from my experience:
– Borosilicate glass is worth the extra cash if you microwave a lot.
– Stainless steel is great but friggin’ heavy for commuting.
– Plastic is light, but if you smell anything off, ditch it.
Also: labels fade in dishwashers. Use a sharpie inside the lid area.
Sharpie inside the lid is genius. I tried on the bottom and it eventually faded. Thanks!
Agreed on stainless — I love it for durability but my bike bag hates the weight 😂
Thanks Emily — those are perfect practical notes. I’ll expand the portability vs durability subsection based on this.
For labels, try printable waterproof labels or even those little silicone bands — reusable and cute.
Also FYI: glass lids with silicone rims are a pain to clean sometimes — flip them inside out in the dishwasher to avoid trapped gunk.
Great read. Quick question: how worried should I be about BPA if the plastic says ‘BPA-free’ but still smells weird? 🤔
Same — returned a set once because it reeked. Went with stainless lids and glass bottoms, problem solved.
If there’s a persistent chemical smell, it’s often a manufacturing residue or low-quality plastic. BPA-free is good, but personally I’d avoid anything with strong odors and choose well-reviewed brands.
Solid guide. One question: for a family of 4 (two adults, two kids), what sizes would you recommend? Buying one uniform set seems cheaper but maybe less flexible.
Also: are compartmented trays better for kids or do they just end up mixing everything when they mash it? Asking for science (and kids).
We got a mixed set and it’s been perfect. Kids love the divided ones — keeps them from dumping the sauce all over everything… mostly.
For families, I often recommend a mix: medium (700-900ml) for adults, smaller (350-500ml) for kids, and a couple of large 1.2L for shared meals. Compartment trays can help portion control for kids, but make sure compartments are shallow — deep ones encourage mixing.
Also consider stackable lunch boxes that lock together for school days. Saves space and keeps sets organized.
If the kids are toddlers, none of this will matter. They’ll just prefer the container that squeaks the loudest 😅
Huge fan of the portion control section — finally a guide that mentions compartments instead of just sizes.
Question: do you have recommendations for meal preppers who want to do mixes of hot and cold in the same container? Like salad + warm grain? I’m worried about sogginess.
Love the testing & care step too. Testing with a full day of meals before committing is low-effort and high-payoff.
If you’re serious about crunch, mason jars are underrated for salads — just flip when ready to eat.
You could also just accept sogginess and call it ‘marinated flavoring’ 😂 but for real, separate is best.
Good point — for hot+cold, I recommend containers with removable inner compartments or using a small silicone cup for dressings. Another trick: keep dressing separate until ready to eat.
I use little silicone cups for wet stuff, and put greens on top. Keeps everything crisp. Also pack cold items in a little insulated bag if needed.
Wanted to add some care tips that I didn’t see spelled out: always dry lids fully before stacking to prevent mold between seals.
Also, watch out for staining from tomato sauces — white bottoms + tomato = nope. If you meal prep a lot of curries/tomato stuff, pick darker or glass containers.
Last thing: avoid tight freezer stacking with glass unless you leave a tiny headspace — glass expands when freezing and can crack if completely full.
I just use plastic for freezer stuff now — less heartbreaking when it pops.
Good call on headspace. I cracked a glass once by filling it flush with soup before freezing. Lesson learned.
Excellent practical tips, Laura. I’ll add a short section on staining and freezing precautions in the care step.