
Why Carry a Pocket UV?
You move fast. You eat on the run. You stash bottles and cups in bags. Microbes ride with you. A pocket UV gives you a fast way to cut their chance to live.
This article shows how portable UV works. It helps you choose the right pocket UV for your containers. It gives safe, effective use tips and protocols. It shows real-world use cases and simple troubleshooting. Read on to protect your gear and yourself.


How to Use the UV Care Pocket Sterilizer for Quick, Safe Sanitization
How Portable UV Sterilizers Work
The simple idea
You point light. The light breaks the microbe’s code. That code is the DNA or RNA. UV-C light splits bonds. The germ can no longer copy. It dies or it stops infecting. You get fewer live microbes on your cup, bottle, or lid.
The light that does the work
Not all UV is the same. Sunlight gives UVA and UVB. Those barely kill microbes. You need UV-C. It sits in the 250–280 nm range. Many cheap sticks use a 254 nm mercury lamp. Newer models use UV-C LEDs near 270–280 nm. The wavelength matters. So does raw output.
Lamp output and batteries
Two things set how well the tool works. One is lamp output. That is how much germ-killing energy the lamp dumps per second. The other is battery life. High output kills faster. Low output needs long passes. Run time decides how many containers you can do on a charge. Look for clear specs: mW/cm², or an explicit “seconds per square inch” claim. If the brand hides numbers, ask for them.
Distance, time, and shadows
UV-C does not pass through air like magic. It fades with distance. Closer is stronger. Shadows stop it. Dirt and grime block it. So you must wipe a sticky rim first. Then use the lamp close and steady. Most real-world use calls for a slow sweep. Think steady motion, not a flick. For tough spots, hold the lamp in place for several seconds.
Practical tip:
What it will do — and what it won’t
It will reduce surface bacteria, viruses, and mold cells you can reach. It will not sterilize a soiled, shadowed, or layered surface in one pass. It will not penetrate opaque materials. It will not “sanitize” the inside of a closed bottle unless you expose the interior with a mirror or long wand designed for bottles.
A real example: you scan a coffee cup lid. The UV removes fresh contamination in a minute. It won’t fix a moldy gasket you can’t reach under the rim. You will still need routine deep cleaning and dishwashing for food contact surfaces.
Safety in brief
UV-C hurts eyes and skin. Do not stare into the beam. Avoid direct skin exposure. Most pocket units add safety cutoffs. Use them. Read the manual.
How to judge a unit
Ask for these points before you buy:
You now know the mechanics. Next, you will learn how to pick a pocket UV that fits your bottles, mugs, and routine.
Choosing the Right Pocket UV for Your Containers
You know the use. Now pick the tool. Match shape and size. Match power and port. Do not guess.
Match shape and size to the job
Narrow bottles need a slim wand. Wide mugs and lids take a short box or tray. Deep flasks ask for a long, thin probe or a foldable wand you can insert. Think of the worst spot on your gear. Buy for that.
A slim wand slides into a thermos neck. A short box fits caps, mouthpieces, and baby spoons. If you travel, favor foldable or multi‑hinge designs that pack flat.
Power, run time, and real specs
Look for clear numbers. Wavelength should read near 254–280 nm. The label should give irradiance (mW/cm²) or a dose guide (J/cm² or “seconds per square inch”). If you see only vague claims, move on.
You want enough power to cut time. High output shortens passes. Low output needs slow sweeps. Check run time and charge time. A bright wand that dies in five minutes is useless on a long trip.
Safety and controls
Pick models with safety shutoffs. Look for auto‑off if tipped. Look for motion sensors or a child lock. Simple controls are best. One button. One LED for battery. No menus. A clear safety cutout saves your eyes and skin.
Build, materials, and packing
Glass and stainless pass UV well. Many plastics block UV-C. If you treat plastic lids, test first. Look for a sealed output rating and solid housing. Metal bodies last. Lightweight plastics save pack weight. You will balance power and ease. If you hike, prefer light. If you sanitize many items at home, prefer heft and battery life.
Read labels like a pro
Scan for these lines:
If the label gives no numbers, ask the seller. A clear spec sheet beats marketing words.
Test at home before trust
Buy a cheap UV‑C indicator card or dosimeter strip. Run a few passes on a clean lid. Hold the wand at the distance the label lists. Watch the card change. Or use an ATP surface swab if you want biological proof. Do before and after checks. If the card barely reacts, the wand is weak or too far away.
You will know what fits and what works. Next: how to use the tool safely and for real results.
Safe and Effective Use: Tips and Protocols
Prep: clean first
UV is a tool. It is no scrub. Wipe away food, grease, and grit first. Wash with soap and dry. UV cannot reach microbes under grime. If you skip this, you waste time.
Positioning and motion
Hold the lamp close. Ten millimeters is better than ten centimeters. Keep the beam aimed at the surface. Move slowly for corners and seams. Let the light sweep, not flash. Make steady passes. For tight spots, pause and aim directly.
Timing and dose
Match the exposure to the lamp power. Read the spec sheet. If the maker lists seconds per square inch, follow it. If not, plan two short passes instead of one quick swipe. Higher output cuts time. Low output needs slower, multiple passes. When in doubt, increase time, not speed.
Safety first
Do not point the lamp at your eyes or skin. Never treat living tissue. UV-C burns and harms vision. Use the lamp over empty items. Use gloves if you want. Keep kids and pets away. Choose models with safety shutoffs and locks. Respect the beam.
Store and maintain
Turn the device off before you pack it. Keep the lamp in its pouch. Charge batteries before trips. Replace bulbs per the maker’s guide. A dim lamp gives weak results. If the light flickers, stop and repair or replace.
Test and verify
Use an indicator card or a simple ATP swab to confirm you reached a dose. Test lids and bottle mouths after your routine. If a swab shows a drop, you won. If not, change your distance or add a pass.
Quick routines you can use now
Real use note
A traveler I know cleaned a camping mug. He wiped the ring of dried coffee. He held a wand close and swept slowly for 20 seconds. The mug looked and smelled better. He carried on with his hike. Small routines make big differences.
Follow the steps. Be steady. Test often. Repeat when you need consistent results.
Real-World Use Cases and Troubleshooting
Where to use it
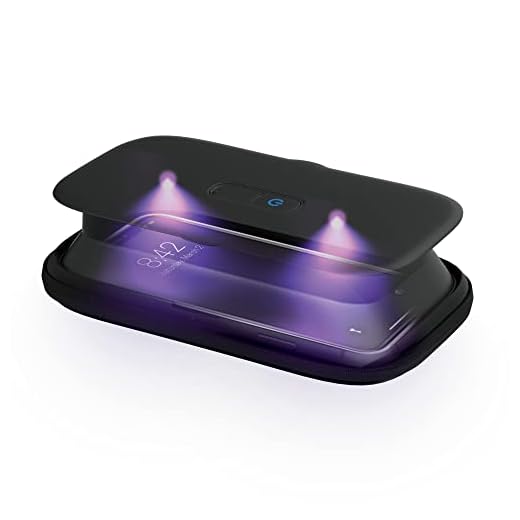
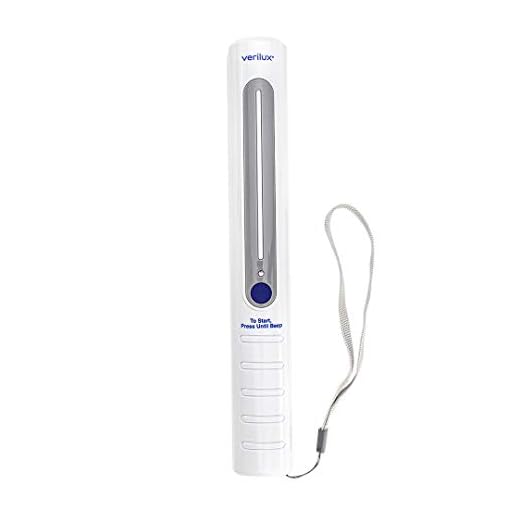
Use your pocket UV on smooth, hard surfaces. Good picks: travel mugs, bottle rims, baby bottles, food jars, pill bottles, door handles, shared gear. Open lids and gaskets. Treat seams and rims. For water in a bottle, use a purpose-built unit like a SteriPEN. For quick surface work, a wand such as the Verilux CleanWave works well.
Fast fixes when output feels weak
Check the simple things first.
Signs you need a new lamp or part
Watch for clear signals.
When plastic or containers fail tests
If a plastic item discolors, bubble, or smells burned after UV, stop. Discoloration means damage. Do an ATP swab or indicator card if you want proof. If readings stay high, toss the container. Deep scratches and pits hide germs. Replace scratched bottles and lids.
When UV will not help
UV is not magic. It fails on:
Quick, real tips you can use now
A nurse I know carries a small wand. She cleans a toy or handle in two passes. She uses indicator cards at home. She tosses anything with deep gouges. You can do the same.
Now move to the final takeaways and how to carry light and keep containers safe.
Carry Light. Keep Containers Safe.
You carry a small tool with big reach. You hold simple power in your pocket. You cut risk fast. Use the right unit. Use it right. Keep safety first.
Clean your gear after use. Store it dry and away from kids. Scan surfaces when you travel. A pocket UV gives swift peace of mind. Carry light. Keep containers safe. Act now to cut germs on the go. Make it routine every day. Be ready now.


Anyone tried sanitizing Tupperware lids with the box? I pack salads with dressing and worry about bacteria around the lid seals. The box seems perfect but lids are bigger than my sink.
If you have lots of lids, consider a rotation system and deep-clean with soap occasionally. UV is great but not a complete replacement for mechanical cleaning.
Tupperware lids should work in the sanitizer box if they fit. If not, use the foldable wand and focus on seals and crevices, rotating the lid so every surface gets direct UV exposure — usually 60s per side depending on intensity.
I do my lids with the foldable wand — lay them flat, do one side, flip, and do the other. Make sure the silicone seals are dry or UV is less effective.
Great read — I never thought about carrying a pocket UV for my lunch containers. The section on how portable UV sterilizers work cleared up a lot (I was worried about ozone and chemicals).
Quick question: for a stainless steel travel mug, do I need to open it and wave the wand inside, or does the sanitizer box work better?
Thanks, Sarah — good question. For stainless steel travel mugs, the handheld wand or foldable wand is better for in-place sterilization (wave it inside for about 30–60 seconds depending on the model). The sanitizing box works great for smaller items like lunchboxes lids, utensils, or baby bottles but may not fit tall mugs.
I use the Foldable Portable UV-C Wand for my mug. Open it and angle the LEDs toward any visible wet spots — 45-60s per area. Don’t forget to dry it first for best results.
Also make sure the wand has enough battery. My wand slowed down signal-wise when battery was low, and I had to double-check with extra passes.
I appreciate the troubleshooting section — my first wand gave inconsistent results (leds flickered). The article suggested checking connectors and charging cable, which fixed mine. Thx! : )
Glad it helped! Flicker can be poor connections, low battery, or damaged LEDs. If persistent, contact seller or replace — flickering reduces effectiveness.
Also try different chargers — some cheap USB adapters don’t supply stable current.
I had flicker due to a loose battery pack inside a cheap knockoff. Opened it (voided warranty, I know) and tightened screws — worked better but buyer beware.
Love the ‘Carry Light. Keep Containers Safe.’ tagline. Practical and catchy. One nit: wish there were more tips on sanitizing kids’ snack containers without scaring them (they hate my ‘UV wand’ explanation).
Try making it a game — ‘magic light’ that makes germs disappear — but never point it at their skin or eyes. Use the box for small toys and utensils to keep it safe and simple.
Also consider a portable box for kid items — less scary and more contained.
I told my kid it’s like a flashlight for bad guys (germs) and let him press buttons under supervision. Now he thinks it’s cool.
I bought the Compact Verilux CleanWave Portable UV-C Travel Wand after reading this. Noticed it’s small and easy to stow. Quick note: don’t trust one short pass — I do two passes to be safe. Also, some surfaces might have shadowed areas, so angle it.
Same here — double pass + angle. I carry it in my glove compartment and it’s saved me from worrying about takeout containers.
Good point, Carlos. Shadows and crevices reduce UV exposure, so multiple angles/passes help. Also follow the manufacturer’s recommended distance and time (usually printed on the device).
Skeptical but intrigued. Is UV-C actually effective on porous surfaces like cloth or on dried food residue? I wouldn’t want a false sense of security.
Valid skepticism. UV-C is less effective on porous surfaces and can’t penetrate deeply into folds or dried organic matter. It’s best used on smooth, nonporous surfaces and as a supplement to cleaning, not a replacement for washing.
I use it on backpacks’ water bottle pockets and hard lunchbox interiors, not on cloth napkins. For fabrics, washing is better.
And don’t forget to clean first — UV won’t do a great job if there’s grime blocking the light.
Minor nitpick: would be nice if the article had more visuals for angling the wand into container crevices. Still, the real-world use cases section had some good scenarios I hadn’t thought of (gym bottles!).
I used a flashlight and mirror to angle once — kind of hacky but worked for tricky lids.
Thanks, Olivia — noted. We’ll add diagrams or short videos next update to show angles and passes for common containers.
Visuals would be super helpful — sometimes I overthink the angle and then under-treat spots.
I’d love a quick comparison: Portable Rechargeable UV-C Sanitizer box vs Handheld 253nm wand vs Foldable 20-LED wand vs Verilux: which is best for everyday commuting and reusable water bottles? Pros/cons would help.
Short comparison: Box = best for small objects, enclosed, safe; Handheld 253nm wand = powerful, good for quick surfaces but needs care; Foldable 20-LED = compact, flexible angles, good for odd shapes; Verilux = compact travel option, user-friendly. For bottles: usually a wand (foldable or Verilux) for inside, box if the bottle fits or for lids/utensils.
If you carry on public transport, the Verilux is stealthy and small. The 253nm wand felt overkill and a bit scary at first.
I use the foldable wand because it fits in my bag and I can angle it into weird grooves on my bottle lid.
Does anyone know if the Portable Rechargeable UV-C Sanitizer Box supports USB-C charging? Listings for older models still use micro-USB, which feels dated.
It depends on model and seller. Newer versions increasingly use USB-C, but always check the product details or Q&A. If USB-C isn’t listed, ask the seller directly.
Bought one last month that has USB-C — much faster and convenient.
If you’re buying for travel, USB-C is a good call — more universal now.
Does anyone worry about skin exposure? I almost shined a wand on my hand by accident 😂 — read the safety tips and realized UV-C is not something to get casual with.
Yep — glad you caught that! UV-C can irritate skin and eyes. Never point it at skin/eyes, use protective cases or cover the area you’re sanitizing, and follow the device safety instructions.
I bought the rechargeable sanitizer box for cutlery and small bottles. Way less worry about accidental exposure since the box is enclosed.
If you have to use a wand, sunglasses won’t help (they’re not rated for UV-C). Treat it like a laser pointer — keep away from people and pets.
Funny story: I accidentally left the Foldable 20-LED wand in my bag and it turned on during a flight (alarmingly bright). Thankfully mental note: secure it in a pouch and lock the power switch. 😂
Most Verilux models have a cover or lock. Read the user manual — it saved me once.
I tape the switch when traveling. Not ideal but prevents accidental activation.
Yikes — glad nothing worse happened. Many models have safety locks or require a press-and-hold. Worth checking that feature before buying for travel.
I wish there were a concise table of recommended exposure times per device and distance. The article is great but sometimes I want a quick cheat-sheet for 20 LEDs vs 1 253nm bulb.
Good suggestion — I’ll consider adding a quick reference. General rule: higher intensity/fewer LEDs (253nm) often needs less time; multiple-LED units may need longer passes. Always follow the device manual for exact timings.
A pocket cheat-sheet helps. For my foldable wand: 30s per surface at 2–3 cm distance. YMMV with different models.
Also remember: distance matters more than time sometimes. Closer = stronger dose = shorter exposure needed.
Battery life question: the article mentions rechargeable wands — how long do they actually last in real use? I’m thinking of buying one for travel trips where charging options are limited.
Typical rechargeable wands run 1–3 hours of intermittent use on a full charge, depending on LED count and power. The Foldable 20-LED might be shorter than a compact Verilux unit. Check mAh and vendor reviews.
I get about 90 minutes on my foldable wand with moderate use. Keep a small power bank in your bag if you travel.
I brought mine on a week-long trip and charged at hotels — no problem. If you’re camping, bring spare battery packs.
Small rant: some product listings are vague about actual wavelength and exposure time. The article helped, but Amazon listings often just say ‘UV’ — buyer beware. 😒
Totally — always check for explicit UV-C (around 254nm) and vendor specs on exposure time/distance. If it’s vague, look for manuals or Q&A, or consider other verified brands.
Also check return policy. I returned one because it listed 254nm but was actually 280nm LEDs (less effective).
Agreed. I messaged sellers asking for wavelength and received copies of the spec sheet before buying. Worth the extra minute.
Bought a cheap handheld 253nm wand and the switch broke after two weeks. Lesson: don’t go for the cheapest one. The article’s product list is helpful — anyone recommend a durable mid-range pick?
Check the seller’s return policy — I returned a dud within 30 days and got my money back.
Sorry to hear that. For durability, look for brands with solid build, good reviews, and warranty. Verilux tends to be reliable; mid-range foldable wands with metal hinges are also decent. Avoid no-name super cheap variants.
Verilux has been solid for me. Higher price but you get sturdier housing and better customer support.