
Start by Testing Heat
Heat is your knife. Use it well and food will sing. Most home woks do not act like you think. They hide hot spots and slow zones. You must learn them.
You will test. Fast checks. Clear signs. This article shows how. First, why heat matters. Then how to map zones and see response. Next, how to control heat with settings, timing, and moves. Then how to push heat to build flavor: sear, Maillard, smoke. Finally, how to keep your wok honest with care, quick tests, and fixes.
Do the tests. Cook with intent. Save time. Make bold food. You will taste the gain. Start simple. Record what you learn and repeat the wins each time.


Wok-Hei Booster: Instant Breath-of-the-Wok Flavor for Any Stir-Fry
Why Heat Matters for Your Electric Wok
Heat makes flavor
Heat builds flavor. It drives the Maillard reaction. That brown crust is not magic. It is chemistry. Maillard starts near 285°F (140°C) and grows as you climb. Push past 325–375°F and flavors deepen. You get nuttiness, caramel notes, and grill-like bites. Low heat gives you pale, soft food. High heat gives you crust and contrast.
Heat shapes texture
Heat tames moisture. It closes the pores of meat so juices stay inside. It shrinks vegetables fast so they stay crisp. It cooks thin things through in seconds. When you time it right, you get a crisp outside and a juicy core. When you miss it, you get gray meat, limp veg, and water on the plate.
Electric woks act on their own
Electric elements heat the pan, not the flame. The shape of the wok and the location of the element set the hot spots. Wattage matters. A 1500 W unit will heat faster than 800 W. Thin nonstick pans heat fast and cool fast. Thick carbon steel holds heat longer.
Test your unit. Note how long it takes to go from cold to sear. Learn how long oil needs to shimmer. Learn how long food keeps cooking after you pull it off. These are the rules you must know.
Signs of wrong heat
Watch the food. You will tell when heat is wrong.
These signs save you time. They tell you to raise, lower, or move the food.
Quick, actionable checks
Do this before you start:
Know these facts. Then you can push heat when you want a sear. Next you will map your wok and find those hot and slow zones for real cooking advantage.
Map Your Wok: Find Heat Zones and Response
Read the pan
You must learn your wok like a map. The center will often run hottest. The rim will run cooler. The element, the pan shape, and the corded base decide where heat lives. Watch how oil moves. Watch how water dances. Those moves tell you where to sear and where to slow-cook.
Tools and quick checks
Use a few cheap tools and quick tests. They tell you the shape of heat.
Keep simple numbers. Note minutes to shimmer. Note how long a scallion takes. Write it down.
Test heat climb and hold
Time the rise. Start cold. Set the dial. Watch the oil. Mark time to sear. Then pull heat and watch how long food keeps cooking. On a 1500 W unit the center may sear in 3–4 minutes. On an 800 W unit it may take twice that. Thin pans heat fast and cool fast. Thick pans hold heat.
Make a practical map
Divide the pan in three rings: center, inner ring, rim. Note how each ring behaves at low, medium, and high settings. Your map only needs three notes per ring:
Use the map when you cook
Move food with purpose. Sear in center. Finish on the inner ring. Rest on the rim. Toss quickly across hot spots. Slide meat to the cool edge to stop cooking. Your map cuts surprise and saves flavor.
Control Heat: Settings, Timing, and Technique
Know your dial
You must control heat, not chase it. Learn what low, medium, and high mean on your machine. On a 1500 W electric wok, high will sear in 2–4 minutes. On an 800–1000 W unit, expect twice that time. Mark the dial positions that give you a shimmer, a steady hiss, and a gentle sizzle. Test once. Trust the test.
Preheat until oil sings
Preheat the wok. Add oil. Wait until it shimmers and gives a thin, steady sound. That is the voice of sear. If oil smokes fast, you are too hot. If it never sings, you will stew not sear.
Start high. Drop to finish.
Begin on high for color and Maillard. Sear meat or vegetables for a short time. Then move to medium to finish cooking through. This saves crust and keeps juices. Think in stages. Sear. Slide to medium. Cover if you need to carry heat without burning.
Short bursts and lids
Thin items need short shocks of heat. Shrimp and scallions use 20–40 seconds per side. Thin steak strips take 30–60 seconds. Thick cuts need a sear then lower heat or a lid to finish. Use the lid to trap steam and cook gently. Lower the dial once the lid is on.
Time and thermometer
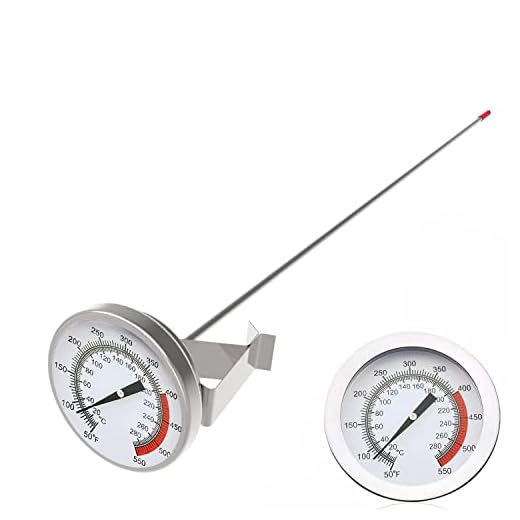
Time your steps. Use a probe thermometer for slow recipes. For braise or low simmer, aim for 275–325°F (135–160°C). Watch carryover. A 1-inch chicken breast will climb a few degrees after you pull it.
Hands-on technique
Do not crowd the pan. Crowd and heat falls. Stir with purpose. Press less. Toss more. Move food between hot and cool rings as your map demands. Let the heat you set work for you. Time your moves. Watch oil. Listen to the sound.
Push Heat to Build Flavor: Sear, Maillard, and Smoke
Push heat with purpose
You must push heat to make flavor. High heat makes a crust. It creates brown bits. Those bits taste deep. A hot wok will change bland into rich. Aim for a true sizzle, not a slow simmer.
Pick the right oil and get it hot
Choose oil with a high smoke point. Peanut, grapeseed, or refined avocado work well. They let you hit temperatures that trigger the Maillard reaction without burning.

Preheat until the oil sings. Add the food only when the surface ripples and the oil moves. If the oil smokes in one second, lower the heat. If it never shimmers, you will stew, not sear.
Let a crust form
Add food. Do not touch it. Stand back. Let contact do the work. After 30–90 seconds you will see color and hear a deep hiss. That is the Maillard reaction. Flip once. Move only to finish, not to prod.
This is how steaks gain crust. This is how vegetables get sweet edges. Sear first. Finish on medium.
Deglaze to pull flavor
When brown bits cling, pour a cold liquid at high heat. Stock, wine, soy, or rice vinegar work. The steam lifts the browned bits. Scrape with a flat spatula. The sauce will taste of fire and time.
Use aromatics last; smoke with intent
Add garlic, ginger, scallions, or herbs at the end. They burn fast. For smoky notes, char whole scallions or pepper halves on the wok edge. Toss them in at the last 20–40 seconds. The smoke will layer flavor without bitterness.
If smoke climbs too fast
Open a window. Turn on your vent. Drop the heat for a breath. Wait 30 seconds. Then bring it back. You will lose a touch of intensity. You keep your pan and your kitchen.
Quick field tips
A hot wok gives you crispy edges and deep taste. Use it with intent. Next you will learn how to keep that heat honest with care, tests, and fixes.
Keep Your Wok Honest: Care, Tests, and Fixes
Clean and tune after each cook
You must keep the wok in tune. Clean the surface when it cools a bit. Scrape sticky bits with a soft brush and warm water. Do not use steel wool on coated surfaces. Do not dunk the base or the cord. Wipe the housing with a damp cloth and dry it fast.
Quick tests when heat lags
Preheat the empty wok for five minutes. Use a probe thermometer to read the pan surface. If the temp sits low, try another outlet or plug in a kettle to see if the circuit is weak. Check the control dial and the connection to the heating element. Simple fixes often do the trick.

If the element still underperforms, note the signs: slow rise, cold spots, or tripped breakers. Replace frayed cords or cracked seals. Send the unit to service for element or control repairs when needed. Do not attempt complex wiring unless you know what you are doing.
Season inserts and protect your surface
If your wok uses a cast or carbon steel insert, season it. Wash and dry. Rub a thin layer of high‑smoke oil (peanut, grapeseed, refined avocado). Heat until it smokes, then cool. Repeat two or three times. A good seasoning helps browning and keeps food from sticking.
Keep the right spares on hand
Small tools save meals. Keep these ready:
Fast fixes and safety notes
Tighten loose plugs. Replace worn gaskets before they let moisture into the base. If you smell burning plastic or see sparks, cut power and call service. For small dips in performance, a new cord or a fresh seasoning often restores life.
Do these checks regularly. They keep heat steady and failures rare. With your wok tuned, you are ready for the article’s final push.
Push Heat, Lift Flavor
You now know the tests. You can map heat. You can set it and read its mood. You can push for a sear and pull back for care. Taste will tell you what to tweak. Learn the zones. Time your moves. Trust the smoke and the Maillard. Use quick heat for color. Use patience for sauce. Keep the wok clean and true. Fix parts that lie. Test often. Keep notes. Repeat.
Cook with purpose. Push heat where it helps. Pull back where it harms. Your hands will learn. Your food will sing. Share a dish. Teach a friend. Keep testing. Keep eating. Return to the wok. Find what works. Cook, test, refine, and delight. Often daily.


Quick question: for someone on a budget, which tool from the list gives the best bang for the buck to ‘test heat’ — Lightbeam or ThermoPro? Looking to spend as little as possible but still be accurate.
Lightbeam was cheaper for me and it nailed surface tests. Depends on your priorities.
If you’re mainly checking surface temps and want convenience, the Lightbeam 16-inch instant-read is excellent. The ThermoPro TP16 gives more versatility (internal temps, large display) and is great value too. If budget is tight, choose based on whether you need internal meat temps (ThermoPro) or quick surface checks (Lightbeam).
I went ThermoPro first — watched a lot of home-cook channels recommending it. It’s versatile and I use it daily.
Okay real talk: the “Push Heat to Build Flavor” section made me feel both empowered and slightly terrified. Searing = flavor, but also a fire hazard if you panic and splash oil. 😂
Anyone here use peanut oil from Amazon Grocery for high-heat searing? Thoughts on flavor vs. safety?
Peanut oil has a high smoke point and neutral flavor — great for searing. Still be mindful of splatter and preheat gradually. Use a splatter guard if you’re nervous.
I use Amazon peanut oil all the time. Neutral taste, and it handles heat like a champ. Just wipe any sauce residues from the wok between batches to avoid smoke buildup.
If you have nut allergies in the house, though, consider an alternative high-heat oil like refined avocado. Safety first!
Short and sweet: Push heat but don’t be reckless. My first go I chased smoke and ended up with charred garlic and a smoky kitchen for hours. Learned to raise temp in stages and use the Heavy-Duty Cast Iron Heat Diffuser when I wanted more even heat for sauces.
Nice takeaway, Evan — staged heating is underrated. The diffuser can help smooth out spikes, especially on older electric woks that overshoot.
Story of my life 😂 I now open a window, set the fan, and keep a small bowl of water nearby to cool down pan faster if I misjudge.
Loved the section on “Map Your Wok” — totally changed how I use my Aroma AEW-306. I always thought electric woks were.. meh, but mapping heat zones helped me avoid the dreaded half-soggy stir-fry.
One question: anyone else use the Lightbeam 16-inch instant-read to check oil temp for searing? I’m trying to hit that perfect Maillard without burning the sauce. 😅
Yep, I use the Lightbeam and it saves me from guessing. Pro tip: measure at several spots fast — electric woks have hot spots. And don’t forget to preheat the wok with the diffuser removed if you want a true sear.
Thanks Maya — glad the mapping tip helped! The Lightbeam is great for verifying surface temps. For searing I aim for ~400°F on the pan surface (if your probe can read that), and let the oil smoke lightly before adding protein. If using Amazon peanut oil, it handles high heat well compared to butter.
I tried that with the ThermoPro TP16 too — big LCD makes it easy to read while you’re juggling veggies. Works well!
Neutral take: article was solid but I wanted more on degreasing and post-smoke cleanup. The “Keep Your Wok Honest” section touched on it, but a step-by-step for getting smoke residue off nonstick skillets like the OVENTE would be useful. 😬
If it’s a cast-iron diffuser, a stiff brush and hot water; re-season if you strip it.
I once used a nylon brush and a paste of baking soda — gentle but effective. Don’t cram metal scrapers on nonstick!
Good point, Owen. For OVENTE nonstick surfaces, cool the pan, then soak with warm soapy water and use a soft sponge; avoid abrasive pads. For stubborn residue, simmer water + baking soda for a few minutes to loosen it.
Really practical article. The “Keep Your Wok Honest” part should be required reading. I found a weird cold spot once and it turned out to be a bent contact under the base — fixed it and the searing got way better.
PS: anyone tried the Heavy-Duty Cast Iron Heat Diffuser on induction or electric bases? I used it on an electric plate and it smoothed the heat nicely.
Great troubleshooting example, Liam. The diffuser is mainly for smoothing on gas and some electric coils; on induction it can sometimes interfere with magnetic coupling, but many people use thin cast iron diffusers successfully. Test first and monitor temps.
I use the diffuser on my electric coil stovetop — totally stabilizes things. On glass/ceramic plates it works but be careful not to scratch the surface.
I want to add: timing matters as much as temp. The “Control Heat” section nails that — toggling between full blast for sear and medium for finishing keeps everything juicy. Also, quick shoutout: Aroma AEW-306 users, try a low-wattage finish to keep sauces silky.
(Also accidentally left a thermometer in the wok once. DO NOT do that. ThermoPro TP16 survived but my pride didn’t.)
That low-wattage finish trick saved my pan sauce last week. Learned the hard way with caramelized onion smoke otherwise.
Haha, thermometer in the wok — been there! Glad the TP16 survived. Yes, finishing on lower heat preserves sauce texture and avoids burning sugars.
Constructive feedback: loved the tech tips but would like more visuals on mapping zones (like a diagram). Text is clear, but heat maps are easier to memorize.
Also, small typo in the “Push Heat to Build Flavor” header? Maybe I’m being picky 😂
Thanks Hannah — great suggestion about visuals and for the typo heads-up. We’ll look into adding diagrams in the next update.
Diagrams would help beginners a lot. Even a simple 4-spot map image makes reconciling temps easier.
I appreciated the balance: encouraging higher heat but with safety/maintenance reminders. One experiment: I tried searing at high heat, then finishing with the diffuser under the wok — lowered smoke and kept browning. Might be useful for people who love the crust but hate the smoke alarm 😂
If you want less smoke overall, use refined oils and keep ingredients as dry as possible before searing.
Love that idea. Also, briefly ventilate after searing to remove transient smoke, then finish with lower heat.
Great experiment, Marcus — diffuser during finish is a neat trick. It tames radiant heat while preserving the sear done earlier.
I’ve been using an OVENTE 13-Inch electric skillet alongside my wok for eggs and delicate stuff. The article’s “Control Heat” tips helped me set the timing so the skillet and wok don’t fight each other during big meals.
Also, how often should I test elements on the AEW-306? Monthly? Quarterly?
Good plan using the skillet for gentle items. For testing elements on the AEW-306, try a quick heat map every 2-3 months with your thermometer — more often if you cook heavy or notice uneven cooking. Also check cord and base for wear.
Quarterly has worked for me, but I agree it depends on how much you cook. If you live alone and make stir-fries once a week, quarterly’s fine.
I test mine monthly because I run the wok almost daily. Quick 5-spot check (center + 4 corners) takes like 3 minutes and catches drifty zones early.
Long comment incoming because I’m nerding out:
I measure temps, map zones, then run a few practice sears with scraps of meat before a dinner party. I use the ThermoPro TP16 for quick reads (love the big screen) and the Lightbeam for longer distances or deeper points. Practicing with cheap cuts taught me the timing for Maillard without wasting dinner. Also — when you push heat, remember protein needs a dry surface. Pat dry and salt early to draw out moisture.
Hope that helps someone!
Love the two-thermometer approach. I switch between them depending on whether I’m testing air/surface temps or internal temps.
Fantastic process, Priya — practice runs are golden. Drying protein is a huge tip for achieving a crust without steaming.
Agree with the salt timing tip. Salting too early can make protein weep; find what works for your cut. Also, practice with the Amazon peanut oil you mentioned — more forgiving for high heat.