
Why Swap Plastic Wrap for Silicone Lids
You can swap plastic wrap fast. You save money and the planet. This guide gives clear steps, tools, and care. Replace waste with lids that last. Start today right now.
What You Need
The Shocking Truth About Plastic Wrap—and a Simple, Reusable Swap
Step 1: Take Stock and Toss the Old
Want fewer surprises? Count what you use and why.Take a three-day inventory. Each time you reach for plastic wrap, write it down. Note the dish, bowl, or food. Note sizes roughly. Measure deep bowls and wide plates. Count the lids you already own. Toss torn or sticky wrap. If a wrap still works, keep it but stop buying more.
Make a quick list of what to note:
Match lids to your common shapes. Pick one lid for odd items. This list will save money and cut waste.

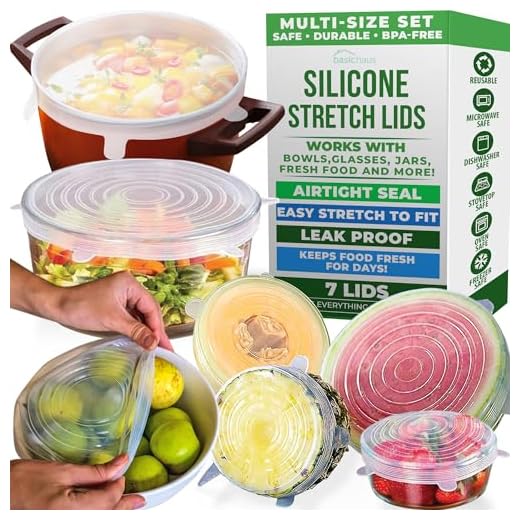
Step 2: Choose the Right Lids
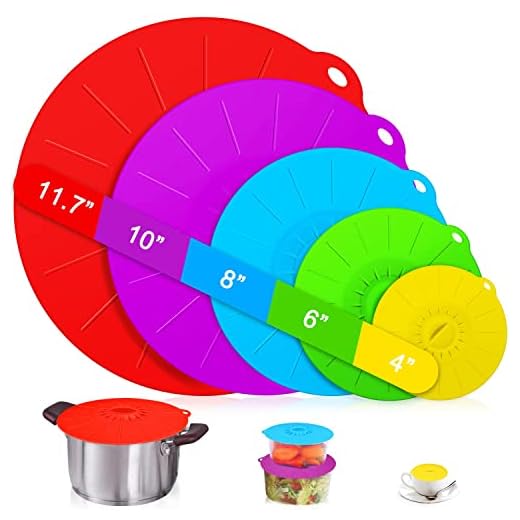
One size fits few. Pick a smart mix and cut future waste.Choose food-grade, BPA-free silicone. Read the label for temperature limits. Some lids take the oven. Some only take cold.
Pick thicker silicone for grip. Pick thin lids when you need big stretch. Choose a mix: small, medium, large. Match small to bowls, medium to plates, large to casseroles. Include jar lids and odd-shape lids.
Look for these features before you buy:
Test the seal by hand in-store. Press the lid center and feel the suction. Read user reviews for real fit notes. Pay more now. Save money and trash later.

Step 3: Try Them at Home
Can a lid save your leftovers? Test it and see.Bring the lids home. Wash them in hot, soapy water. Rinse well.
Dry them with a cloth. Place one on a jar. Stretch it over the rim. Press the center. Feel the seal. Try a jam jar and a soup jar to learn fit.
Test a bowl seal by turning the bowl upside down. Fill it with water first. Watch for drips.
Heat food in the microwave with the lid loosely placed. Do not seal tight when steam can build. Freeze food with lids on. Let hot food cool a bit first.
Swap lids between odd shapes to learn limits. Keep the set near your fridge. Use them daily. Note what fits. Adjust as you go.
Step 4: Learn Care and Cleaning
Want lids that last a decade? Clean and treat them right.Wash lids after each use. Use warm water and soap. Scrub grooves with a soft brush. Rinse well.
Load lids on the top rack if the label allows. Check the label first. Boil lids for two minutes to deep clean. Use boiling after raw meat contact or if you feel unsure.
Soak lids in a baking soda and water mix to lift smells. Rinse again. Avoid bleach and sharp scouring pads. Keep lids away from direct flame and hot pans.
Label sizes. Rotate sets. Keep a spare set. Train your family to snap lids on with care.
Step 5: Swap Habits and Tricks
Small moves, big wins — ditch wrap without pain.Put lids where you can reach them. Keep a small stack in the fridge for leftovers. Use the right lid for leftover bowls first. Wrap only when a lid will not work. Pack lunches with lids to seal and cut spills. Cover bowls while you marinate to save prep time. Freeze soups with lids on. Mark dates on lids with a permanent marker. Reheat with lids loose to vent. Take lids to picnics and trips; fold them small into a bag. Teach your kids and partner to stretch and seal lids. Make a rule: buy no new plastic wrap. Track the cost of wrap you stop buying and count saved dollars and trash. Give yourself a week to adjust. Celebrate small wins. Buy an extra set for guests and show friends why you swapped.

Step 6: Maintain and Scale
Want to go zero-waste further? Scale these wins to the whole kitchen.Inspect lids monthly. Press the seal. If air leaks, replace the lid. Expect lids to last years, but plan for wear.
Buy single lids to fill gaps. Shop local or use trusted online sellers. Keep proof of purchase for warranty. Join community groups to trade lids or swap tips. Offer a spare to a neighbor.
Track waste and money each month. Note meals that still need wrap. Use beeswax wraps or glass covers for odd shapes. Scale lids to the garage, garden, and work lunches. Buy bulk sets for larger households. Use savings to replace other disposables and celebrate your progress.
Wrap Up and Keep Going
You made the swap. Kitchen wastes less. Bills fall. Salads taste fresher. Keep lids in use. Teach others. This small act helps the planet. Keep going daily. Ready to lead?


Just got into the idea of ‘Maintain and Scale’ — I’m thinking of buying more sets to replace all the plastic in my house. Quick help? What sizes should I prioritize first so I don’t waste money on dozens of lids I’ll never use?
Also, any tips on buying quality vs cheap impostors? I saw some almost-identical sets for half the price and I’m wary.
I bought a cheap set once and the lids warped after a month in the dishwasher. Spend a bit more for thicker silicone and better customer reviews. Lesson learned 😅
Good plan, Ethan. Prioritize sizes that match what you use most: 3–4 small (covers mugs, single bowls), 2–3 medium (mixing bowls, lunch containers), and 1–2 large (dishes, casserole). For buying: check for food-grade silicone (BPA-free), temperature range on the packaging, and reviews mentioning durability. Cheaper sets can be fine but watch for a chemical smell out of the box or very flimsy material.
Also check if the set includes oddly shaped ovals — mine had one that perfectly matched a leftover lasagna tray and saved me tons of grief.
If you’re upscaling slowly, buy one mid-range set first and test it for a few weeks before buying more. That way you can confirm sizes that fit your stuff.
Emoji endorsement: 👍🏻 invest in sturdier ones. Your future self will thank you.
Love this guide — finally a realistic plan to ditch cling film. I tried Step 3 (Try Them at Home) last week and half my lids worked great, but a couple just wouldn’t seal on my oddly shaped Pyrex.
I followed Step 2 when choosing sizes but maybe I still guessed wrong? Also curious about the “Maintain and Scale” section — how do you store extra lids without them being a tangled mess? Any storage hacks would be awesome. 🙂
Great question, Sophie — glad the guide helped! For oddly shaped containers, silicone lids sometimes need a little warm water to become more flexible before stretching them on. For storage: roll or stack them by size inside a drawer divider or use a pegboard hook for larger ones. Keeping them nested saves a ton of space.
Also, if you notice persistent leaks, check for tiny folds or debris on the rim — sometimes food bits prevent a good seal. A quick rinse and reset usually fixes it.
I had the same issue — I keep a small shallow basket in the pantry and stack lids by size. For weird bowls I use a larger lid plus a cloth over the top + rubber band in a pinch. Not pretty but it works 😂
So I bought a set after reading Step 5 (Swap Habits and Tricks) and told myself this would be a zen change. Reality: my toddler thinks the lids are Frisbees and now we play ‘lid toss’ at 7am. 😂
But seriously, the guide’s tip about labeling lids for leftovers is GOLD. I put masking tape on the edge and write the date. Quick Q: do silicone lids hold up in the freezer or do they get brittle? I may need to hide them from my tiny frisbee champion first.
We freeze soups in silicone-lidded containers all the time. Just make sure you leave headspace so the liquid can expand. And yes, toddler theft is real — hide the small lids!
And if you want a temporary solution to the Frisbee problem: assign one cheap plastic lid as ‘play lid’ so the good ones stay in the kitchen 😅
Masking tape trick = life saver. Also, I stick a tiny vegetable sticker on the tape if I forget what the food is. Works wonders.
Haha love the lid-frisbee image. Good news: most food-grade silicone lids handle freezer temps fine — they become stiffer but shouldn’t crack. Press them on while the food is still room temp or slightly cooled for best seals. If you’re freezing very flat items, put a layer (like parchment) between lid and food if sticking’s an issue.
I like the idea but a few things felt glossed over. How do these lids deal with staining (tomato sauces) and lingering odors? The guide mentions cleaning but not long-term color changes. If they look gross after a few uses I’ll probably go back to containers with snap lids.
I had a yellowish tint from curry once — hydrogen peroxide soak for an hour did wonders. Not perfect but much better.
Fair point, Alex. Silicone can stain from things like turmeric or tomato sauce. For color: a soak in warm water with baking soda and a little dish soap, then sun-dry helps fade stains. For odors: vinegar or a paste of baking soda + water, let sit, then wash. If staining is a dealbreaker, look for lids in darker colors or use glass containers for very staining foods.
Nice step-by-step. One thing I’m not clear on: Step 1 says ‘Take Stock and Toss the Old’ — is it really okay to just throw away the old plastic wrap? Any tips for responsibly disposing or recycling it? I try to be eco-friendly but hate the idea of just chucking things.
Totally fair, Tom. Most plastic wrap isn’t widely recyclable curbside, but many grocery stores accept thin plastics (like film and bags) in their drop-off bins. Also consider reusing clean wrap for non-food tasks if possible, or look into municipal programs. The guide aimed to encourage reducing usage first — minimizing future waste is the big win.
Yep — I keep a tiny bag of clean plastic wrap and drop it off with my grocery store’s plastic bag recycling. Not perfect, but better than the trash.
Thanks for the detailed care section. I have a couple of questions about cleaning and microwaving:
– Are they dishwasher safe? Which rack is best?
– Can I use them in the microwave with food still inside or should I remove them first?
I liked the step about trying them at home first — saved me from buying a huge set right away. Also: note to self, don’t use metal utensils near the edges!
Most high-quality silicone lids are dishwasher safe — top rack recommended to avoid direct contact with heating elements. For microwaving: you can use them but leave a small vent or lift one edge to let steam escape; never seal airtight in the microwave as pressure can build up.
Top rack in my dishwasher too. I usually remove lids for reheating to be safe, then pop them back on afterwards.
Good note about metal utensils — they can nick the silicone. Wooden or silicone utensils are gentler.
Great guide — simple and actionable. Made the switch and I’m already using less plastic. Thx! lol
Same here — feels good to see the pantry with fewer rolls of cling film. 🙌
Awesome, Noah — thanks for the note! Small swaps really add up over time. Keep us posted if you find any favorite tricks.