
Why Your Hot Pot Should Sing
You make a hot pot. You want it to sing. This guide shows you how. It gives gear, stock, heat, and ingredient rules. It gives care and fixes. Read with purpose. Try as you go.
You will learn to pick the right pot and fuel. You will learn to layer broth like a pro. You will tame heat for exact texture. You will use bold ingredients that lift the whole pot. You will learn simple care to keep it singing.
Start small. Taste often. Repeat what works. Make the sound of a true hot pot.
You will gain calm, skill, and quick fixes. Your table will hum with clear, honest flavor every time. Soon, proudly.


Ultimate Hot Pot Sauce: Share Your Best Creations!
Pick the Right Pot and Fuel
Choose your pot
Pick solid gear. Thick walls hold steady heat. Cast iron stores heat like a stone. It keeps a slow simmer without fuss. Try a Lodge skillet or a Le Creuset Dutch oven for that steady deep heat. Clay pots — a Japanese donabe — give slow, even warmth and a soft mouthfeel to broths. Stainless steels, like All‑Clad D3, heat fast and reply to every twist of the knob. They are clean and quick. Match the pot to the job.
Match pot to fuel
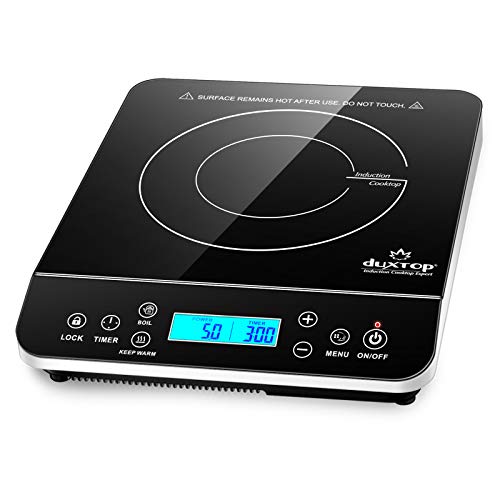
Think of fuel as your voice. Gas gives you fast control. You twist. The flame answers. Induction is smooth. It heats fast and evenly. You need flat, magnetic bottoms. A Duxtop portable induction unit works well for table service. Charcoal adds smoke and bite. It will change the broth and the mood. For table hot pots, consider a butane tabletop stove like an Iwatani unit. It is reliable and compact.
Size, lid, and handles
Size matters. For 1–2 people, aim 1.5–2.5 L. For 3–4, go 3–4 L. For a crowd, 5 L or more. Too big wastes fuel. Too small crowds the food and drops the heat fast. Check the lid. It must fit tight. A tight lid keeps steam and flavor. Handles should stay cool or be easy to lift. Think about the weight you will move between stove and table.
Care and real talk
Each pot asks for different care. Cast iron needs seasoning and warm drying. Clay can crack if you shock it with cold water. Stainless resists stains but can show scorch marks. Know the rules before you buy. Try lifting the pot in the store. Feel the lid. Picture your stove and table. Make a choice that matches your fuel and your life.
Next, you will learn to layer flavors so the pot sings.
Layer Flavors Like a Pro
Start with good stock
Begin here. Use plain water and good raw stuff. Roast bones at 425°F until deep brown. Sear vegetables until they have color. Brown adds depth. Low and slow pulls more from the bones. For veg broth, sweat onions and carrots hard. Let them sweeten. That small step lifts a plain pot.
Build in steps
Add flavor in waves. Start with the bones or veg and water. Bring to a slow simmer. Skim the cloudy foam. Add your hard aromatics next—onion, carrot, celery. Then herbs and gentle aromatics—garlic, ginger, scallion. Add salt in stages. Salt early, but lightly. Finish salt at the end.
Use umami and brighteners
Bring umami in small hits. Dried shiitake, kombu, soy, miso, or fermented bean paste deepen the broth without heaviness. A strip of kombu for 20 minutes adds sea depth. A splash of soy adds roundness. Keep fermented items light. Add them with intent. Balance fat with acid near the end. A teaspoon of rice vinegar, a squeeze of lemon, or a splash of sherry will lift a full broth.
Keep it clear and reusable
Want a clear pot? Strain through a fine mesh or a chinois. Chill and remove the fat that rises. Gelled stock is a sign of real extract. Freeze portions in ice cube trays or mason jars. Use the base again. It saves hours on weeknights.
Taste and adjust with small moves
Taste often. Adjust in tiny steps. Add a pinch of salt. Try a squeeze of lemon. A dab of soy will not ruin it. Small moves steer the pot without wrecking it. Let time do the work. Keep stirring only when you must. The next section will show how to control heat and texture.
Control Heat for Perfect Texture
Know your zones
You need zones. Hot for a flash. Low for a slow cook. Set one side hotter than the rest. Use it for quick items. Use the cooler side for finish or rest. On a gas range the flame is raw and fast. On induction the change is instant and precise.
Boil, then simmer
Bring the broth to a clean, rolling boil at first. Let the foam rise. Skim it off. That clears the pot. After a few minutes, drop to a low, steady simmer. Let the broth breathe. For very long cooks, keep a soft boil. It keeps things moving without breaking them.
Match heat to the ingredient
Know what each thing needs. Time your drops.
Set your hot zone for meat that needs a sear or quick cook. Use the low zone to avoid pounding proteins with hard bubbles.
Watch the surface
Too many big bubbles beat meat apart. The broth will look agitated. That is not always better. Aim for small, slow bubbles when you want tenderness. Use a ladle to check. Scoop a piece out. Taste for texture. If it falls apart, lower the heat.
Move food gently and time it right
Stir with care. Scoop and drop. Don’t toss. Add delicate things last. Batch quick items so the broth stays steady. Use a small wire skimmer or slotted spoon to lift slices and test. Set a timer for short cooks. You will learn the rhythm.
These moves give you control. They let each bite finish as it should. Next you will choose ingredients that sing in those exact moments.
Use Ingredients That Sing
You chose the heat. Now choose the players. Pick food that holds up. Pick food that adds a clear tone. One bright flavor. One strong texture. Then let each bite speak.
Pick the right cuts
Tough cuts like chuck, brisket, and shank gain from long, slow baths. They turn soft and rich. Tender cuts — ribeye, tenderloin, thin pork loin — need a quick dip. Slice to the right thickness.
A good rule: 2–3 mm for quick cooks. 6–10 mm for slow melded bites. Use a sharp Victorinox 8″ chef’s knife or a slicer to keep edges clean.
Slice thin and true
Cold meat slices stay neat. Freeze slightly for 15–20 minutes. Slice against the grain. Keep pieces even. Thin slices cook in 5–15 seconds in hot broth. You’ll see the change and pull them out.
Veggies that keep shape
Choose firm vegetables. Carrot, daikon, baby potato, lotus root, corn on the cob. They take time and add bite. Parboil dense roots if you want to speed things up. Soft veg will turn to mush fast.
Add mushrooms and umami
Mushrooms bring musk and depth. Shiitake for wood. Enoki for silk. King oyster for chew. Tear or slice them to match other textures. They soak up broth and give it a note you can taste.

Leafy greens, tofu, dumplings — timing matters
Leafy greens last. Add them in the final 30–60 seconds. Firm tofu and wheat noodles take a bit longer. Silken tofu and dumplings go in near the end. Dumplings puff and then sink. Watch them; they tell you when they’re ready.
Keep sauces and dips bold and simple
Make a few go-to condiments. Soy, toasted sesame, chili oil, vinegar, garlic. Build one spicy, one bright, one fatty. Use herbs and citrus as a final note — cilantro, scallion, lime. Let textures contrast. Crisp with soft. Chewy with silky.
Try this at home. Let each element sing on its own. Next, you will learn how to care for the pot so it keeps doing that.
Care, Clean, and Keep It Singing
Treat the pot right. A small habit keeps the sound true. Clean soon after it cools. Not while it’s hot. Not hours later. Do it within the same day.
Clean it right, fast
Let the pot cool until warm. Scrape loose bits with a wooden spatula. Rinse with warm water. Use salt and a cloth for stuck bits. Do not soak cast iron or clay for hours.
Match scrub to material
Use a chainmail or stiff nylon brush on cast iron. Use a soft sponge on enamel. Use a soft brush on clay. For nonstick, use only soft cloths.
For cast iron, dry it on the stove. Rub a thin layer of oil. Heat until it smokes lightly. That seals the pan again. If rust forms, scrub with steel wool. Re-season after.

For clay, dry slow. Put the pot in a cool oven. Raise heat to low. Let it warm for an hour. Never shock a clay pot from cold to flame. It may crack. For enamel chips, stop the chip from growing. Tape the edge for a short trip home. Then repair or replace.
Small repairs you can do
Check lids, seals, and handles before you cook. Tighten loose screws. Sand rough edges. Fill tiny enamel chips with food-safe repair paste or seek a pro for large damage. Carry simple bits on trips:
Burn off scum, keep it tidy
If scum builds, bring broth to a bare boil. Let it boil five minutes. Skim the top with a ladle. Turn off heat. Wipe the rim and lid. Heat kills grease and loosens film.
Fuel and flame rules
Work in a well-vented spot. Check canisters and hoses for leaks. Store fuel upright and cool. Never leave open flame unattended. Keep a small fire extinguisher near the stove.
Simple care keeps the flavors true and the pot long-lived. Do this each time, and your pot will stay ready. Next, you will start your pot singing.
Start Your Pot Singing
Now you know the parts. You know gear, stock, heat, ingredients, and care. Take one pot. Do one broth. Watch one cook. Keep notes. Tweak and repeat. Small changes bring big gains. Let the pot teach you. Let your food sing.
Begin tonight. Trust your taste. Fail fast. Learn fast. Share a bowl. Keep your tools sharp. Clean the pot. Rest the broth. Return with new aim. Your kitchen will hum. Then start again and repeat.


My hot pot DOESN’T sing yet. It just whispers ominously. 😂 Maybe I need the DIY Hot Sauce Making Kit with Peppers to spice things up? Loved the ‘Start Your Pot Singing’ checklist though — very handheld and not preachy.
Try adding a small spoon of your homemade hot sauce toward the end of boiling — it intensifies aroma. Also taste as you go; DIY kits can be strong, so adjust.
Hahaha same. I made a chili oil from the DIY kit and a tiny drizzle changed the whole vibe. 10/10 would recommend for spice nerds.
Whispering pot = under-seasoned broth or low aromatics. Add ginger, scallion whites, and a splash of soy early on. Boom, singing.
Love the philosophy of ‘Why Your Hot Pot Should Sing’ — totally changed how I think about communal cooking.
Tried the 6L Dual-Flavor Electric Hot Pot Cooker after reading and wow, being able to separate broths is a game changer for mixed groups. Layering flavors like the article suggests (start with bones, add aromatics later) actually made the broth clearer and more complex.
Thanks for the practical tips on cleaning too — the Lodge 5-Piece Cast Iron Care Kit saved my grandma’s pot. 10/10 would recommend.
I use the Instant Pot Duo Plus to make quick bone broth stock then transfer to the electric hot pot — saves time on weeknights. FYI simmering low for 6-8hrs gives that deep flavor without cloudiness.
Agree, the dual cooker is brilliant. Question: did you use the Instant Pot for any prep steps (stock or caramelizing)?
So glad it worked for you, Sarah! The dual-flavor setup really lets people customize without drama — perfect for picky eaters. If you liked the cast iron tips, you might also appreciate the ‘Care, Clean, and Keep It Singing’ mini checklist near the end.
Nice walkthrough. I was torn between the Duxtop Portable 1800W Induction Cooktop Burner and a gas burner for heat control. The article’s ‘Control Heat for Perfect Texture’ section pushed me toward induction — way easier to maintain a rolling simmer.
Yep, induction + a magnetic stainless or cast iron insert = perfect. I ruined one nonstick pan before learning that 😅
Good call — induction is super precise. Just make sure your cookware is induction-compatible; the 21-Piece White Granite Nonstick is not always magnetic. You can test with a magnet.
Quick tip from the ‘Care, Clean, and Keep It Singing’ section: if you’re using cast iron, do NOT soak it overnight after a hot pot party. Rust city. The Lodge 5-Piece Cast Iron Care Kit is tidy and actually makes seasoning easy.
Also, nonstick is great for delicate stuff (eggs, tofu), and the 21-Piece set has saved me from scraping burnt bits during prep.
For those of us with tiny kitchens, does the 21-piece set take up a lot of space? Thinking of downsizing.
I still prefer stainless for high-heat searing before the hot pot — less fear of scratching from ladles and tools.
It stacks ok, but if you have a compact cupboard, consider a few multi-use pieces instead of the whole set.
Totally agree — soak = bad. The article tried to make that point with a few ‘don’ts’ to avoid common mistakes. Glad the Lodge kit worked out for you!
Good piece but I wish it compared fuel types more objectively. The ‘Pick the Right Pot and Fuel’ section was a little light on pros/cons for charcoal/gas vs electric — for me, flame = better caramelization and flavor, not just convenience.
I love the flavor from real flame too, but in shared housing it’s often impractical. The Duxtop gives a good compromise.
Fair point, Omar. We focused more on user-friendly set-ups (like electric and induction) since most readers are apartment cooks, but we’ll add a deeper comparison in the next update covering char/gas pros for flavor.
I bought the 6L Dual-Flavor Electric Hot Pot Cooker after this article and it felt like a small appliance flex at my dinner table. People loved having spicy vs mild sides.
Not gonna lie, it made hosting lazy-friendly: one plug, two broths, everyone happy. Also, the ‘Use Ingredients That Sing’ section made me actually try kombu — never going back.
Spicy mala + mushroom dashi = heaven. Also works if you add a splash of vinegar at the end to brighten it up.
It does okay but stir occasionally and skim. If a side cools, boost heat briefly — the unit recovers fast.
Do you find the dual hot pot keeps temps even on both sides? I’m worried about one side cooling faster with lots of add-ins.
Love the flex! Kombu is a quiet hero — adds umami without overpowering. Any favorite combo you’ve landed on?
Good troubleshooting — skimming and brief heat nudges are simple fixes. We mention that under ‘Control Heat’ as well.
Layering flavors like a pro is underrated. I do: aromatics -> bones -> veggies -> delicate stuff. The article’s timeline (when to add what) saved my last dinner party.
Also, heads-up: if you use the Instant Pot Duo Plus 6-Quart Multicooker to make stock first, reduce for a bit uncovered to concentrate before transferring to the hot pot. It avoids dilution.
Great process — the timing table was meant to be a starting point, glad it helped. Reducing a precooked stock is an excellent pro tip.
Agree on sequencing. I also freeze small batches of concentrated stock so I can always ‘boost’ the pot without hours of simmering.
Short tip: when layering flavors, brown your aromatics quickly before any liquid goes in — it adds a toasty note. Works with both nonstick and cast iron if you’re careful.
Also, the 21-Piece set has a nice saute pan for this exact step.
Nice concise tip — toasting aromatics is a small move with big payback. Appreciate the practical callout about the saute pan.
Agree — a quick fond adds so much complexity. Just don’t burn them!
Also add a splash of water to deglaze and get those flavors into the broth.
Fun article. I especially liked the ‘Start Your Pot Singing’ sample menu. I swapped in some tofu skin and enoki and it was sooo good. Small tweak: add a citrusy condiment to finish — cuts the oiliness nicely.
Citrus is an underrated finisher, thanks for the tip. Yuzu or lime zest can be a subtle lift without making it overtly sour.
I use rice vinegar mixed with a little sugar and garlic as a dipping sauce — super versatile.
I second yuzu! Tiny squeeze at the end brightens everything and makes leftovers taste fresher.
Long-ish cooking nerd rant (sorry not sorry):
I appreciated the ingredient examples in ‘Use Ingredients That Sing’. I experimented with the DIY Hot Sauce Making Kit with Peppers to make a garlicky chili paste and added tiny bits at different stages — beginning, mid, and end — and the flavor profile changed dramatically each time.
Start: deeper, fermented notes. Mid: aromatic heat. End: bright kick. It’s wild how placement changes perception. Also — the Instant Pot is great for quick marrow extraction if you want a really fatty base.
PS: a small nitpick — would love visual timing charts in future updates. I’m a visual learner.
Ooo interesting about adding at different times. I usually dump all in and hope for the best 😂 will try your staged approach.
Visual charts would be amazing — I skimmed and missed timing once and overcooked my noodles. Not a good look 😅
This is gold, Elena — thanks for the detailed experiments. We’ll look into adding visual timing charts in the next revision; totally agree that placement of heat/spice changes the whole experience.
The Instant Pot marrow hack is smart. I roast bones first for color then finish in the IP to pull flavor fast.
Great roundup of products. Quick question for the crowd: if you’re on a budget and can buy only one item from the product list, which would you pick — the 6L Dual-Flavor Electric Hot Pot Cooker, the Duxtop induction burner, or the Instant Pot Duo Plus? Looking for versatility.
If versatility is the goal, the Instant Pot Duo Plus is the most multipurpose — stocks, prep, and even cooking some sides. But for pure hot pot hosting, the dual-flavor hot pot is more plug-and-play.
Instant Pot for sure if you cook other things often. It’s like buying a small sous-chef.
If you mainly want hot pot nights, get the dual hot pot. For everything else, InstaPot wins.
Tech note: if you’re using the Duxtop, be mindful of wattage limits on shared circuits. The ‘Pick the Right Pot and Fuel’ section mentions power but not how quickly an older apartment fuse can trip 😬.
Also, induction responsiveness is amazing for texture control — thin slices of meat cook perfectly when you nudge the temp down a bit mid-cook.
Thanks for that — almost tripped my breaker last winter with a slow cooker + induction combo. Learned the hard way.
Excellent safety reminder, Benjamin. We’ll add a short warning about circuits and suggested breaker capacities for readers in older buildings.
Question: when using the Duxtop induction burner, I find the heat jumps around when I stir. Is that normal, or is my pot just not sitting flat? The ‘Control Heat’ section mentioned even contact but didn’t give troubleshooting steps.
I had the same issue — a silicone mat under the burner helped stabilize small slips, but better is a flatter pot.
If the pot isn’t fully flat or magnetic, the burner cycles more. Try a flat-bottomed stainless or cast iron base. Also check the Duxtop settings — lower increments help stabilize temperature.
Good piece overall. One constructive note: the cleaning section could show more about dealing with stubborn grease in nonstick pans after searing. The 21-Piece White Granite Nonstick Cookware Set is great, but nonstick plus high-heat oil can be messy.
Tip: simmer a little water with baking soda in the pan to loosen burnt bits, then wipe gently — avoids scrubbing the nonstick surface.
Thanks Thomas — we’re adding a subsection on grease management for nonstick and safe deglazing tips. Glad you mentioned it.
This article convinced me to host my first hot pot night. Bought the Duxtop and a few condiments. The ‘Layer Flavors Like a Pro’ timeline was perfect for my nervous brain.
Update: party was a hit, and people asked for the recipe sheet. You made me look like a chef, lol.
So happy it went well! If you want, I can share a downloadable one-page checklist for future hosts — DM the admin email in the footer and I’ll send it.
Congrats! Hosting tip: set up a self-serve condiment station so everyone can customize. Less chef stress = more fun.