
Match What You Need to the Right Specialty Appliance
You want gear that fits the way you live and cook. This guide shows how to match your needs to the right specialty appliance. Weigh space, habits, power, cost, spot features that matter. Avoid common mistakes. Read on. Make a smart pick. Save time and money.
We cover six key areas. Know your needs first — how you use your kitchen. See which appliances serve which needs. Learn features that matter: capacity, controls, build. Face power, venting, installation realities. Compare cost over time: price, energy, service. Decide, buy, keep it working with brands, warranties. Start here. Save hours and money.


Top Reliable Appliance Brands You Can Trust
Know Your Needs First: How You Use Your Kitchen
Count people. Count meals.
Write down who eats here. Note weekday meals. Note weekend cooking. If you cook five nights a week, you need speed and capacity. If you host once a month, you need flexibility, not a pro range. A family of four who bakes often will choose a larger oven. A couple who drinks espresso daily will value a good machine.
Note what you cook
List the techniques you use. Bake, roast, steam, grill, sous-vide? Each demands different gear. If you steam vegetables and sous-vide proteins, a combi-steam or precision cooker matters. If you grill indoors, a high-BTU range or indoor grill helps.
Measure the space
Take a tape. Measure height, depth, and width. Note door swings and walkways. Sketch the run of cabinets. Mark clearances for drawers and appliance doors. Many compact fridges look small until you open the door and hit a counter.
Map utilities
Find the water line, gas stub, and outlet locations. Note circuit breakers. A 240V oven or a gas range changes installation plans. If the gas line sits on the left, pick a model with left-side hookup or plan rerouting.
Prioritize features you will use
Rank features by frequency. You might love a touch screen. But ask: will you use it daily? Choose useful controls over gimmicks. Prefer durable racks and full-extension drawers if you pull heavy pans often.
Quick how-to checklist
Keep these notes. They will rule out poor fits. They will point you to options that you will actually use.
Which Specialty Appliances Serve Which Needs
Hot drinks fast
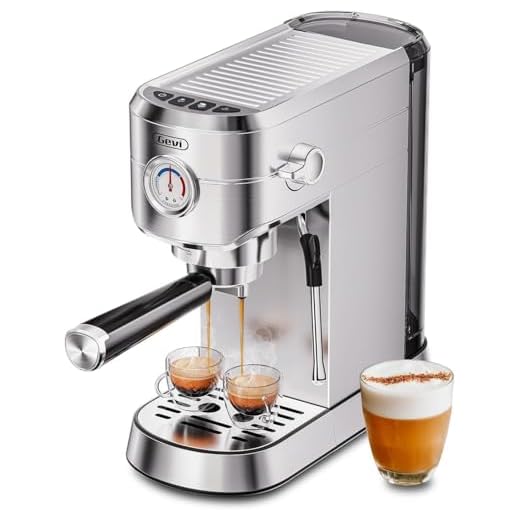
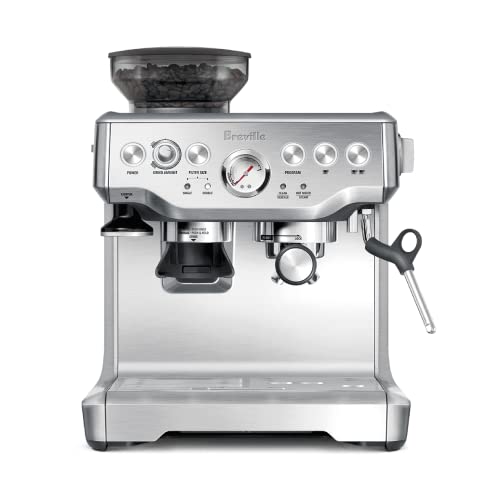
You want espresso, cappuccino, or quick drip. Built-in espresso machines brew café-quality shots on demand. Pod systems make one cup with no mess. If you drink espresso every morning, add a grinder or choose a machine with one.
Tip: pick a machine that fits under your cabinet and has a direct-water line if you hate refilling.
Love wine
You want bottles at the right temp. Dual-zone wine fridges let reds and whites live happily. Look for UV-safe glass and low-vibration compressors. A 24″ undercounter unit holds a dozen to two dozen bottles. A larger upright fits 50+.
Tip: store long-term bottles in a full-size wine cellar fridge.
Entertain often
You need cold drinks, ice, and warm trays. An ice maker that makes clear cubes will save goldfish bowl cocktails. A beverage center keeps mixers ready. A warming drawer holds hot hors d’oeuvres while you greet guests.
Tip: a drawer fridge under the counter frees space in the main fridge.
Bake and proof
You bake bread and roast dinners. A steam oven or convection-steam combo gives crisp crusts and moist interiors. A proofing drawer or warm drawer helps dough rise without a second oven.
Example: pros like steam combos for pastries and weeknight roasts.
Small spaces
You need compact chill or drink storage. Undercounter fridges and drawer fridges slide into tight runs. They fit a condo bar or a tiny prep area.
Tip: measure and leave space for ventilation.
Outdoor cooking
You want heat and smoke outside. A built-in grill gives steady flames. A pizza oven reaches high heat fast for a blistered crust. Choose models rated for your climate and mounting needs.
Next, we will compare the features you should value: capacity, controls, and build.
Features That Matter: Capacity, Controls, and Build
You know what you want. Now match features to your use. Focus on the parts you will touch every day.
Capacity: match routine to output
Buy for real use. A unit rated for 26.5 lbs a day sounds big. For a weekly family of four it is plenty. For a backyard party with 50 guests it is not. Think in meals, drinks, or bottles. Measure by the highest-use hour. A tiny ice maker will stall at peak demand. A drawer fridge that holds six bottles may feel empty when friends arrive.
Controls: simple and repeatable
Decide how you like to work. Do you want knobs or a screen? Knobs give speed. Presets give repeatability. Look for:
Interior layout and trims
Open doors and look inside. Check racks, trays, and shelf adjustability. Pull drawers and test glide. Does the layout fit pizza boxes, wine bottles, loaf pans? Removable trays make cleaning quick.
Build, noise, and serviceability
Pick durable skins like stainless steel. Glass shows scratches and chips. Inspect seals and hinges. Tight seals save energy. Hinges should feel firm, not loose.Listen to the compressor. If it thumps or hums loud, it will bother you. Ask if parts are user-replaceable. Simple designs cut repair bills. Look for replaceable filters, accessible pumps, and clear service manuals.
Maintenance you must do
Know the chores before you buy. Some units need filters, monthly descaling, or door gasket cleaning. Add those time and cost estimates to your decision.
Power, Venting, and Installation Realities
Installation can make or break your plan. You must plan for power, gas, water, vents, and the path to the kitchen. Do the homework before you buy.
Electrical: know volts and amps
Check the spec sheet. Note the voltage and amp draw. Many pro ranges and built-in appliances need 240V and a dedicated 30–60A circuit. Countertop steamers may only need 120V but still want a dedicated circuit. Ask your electrician to read the label. Put the circuit on the bill.
Gas and water lines
Gas ranges need a proper pipe, shutoff, and pressure test. Use a licensed plumber or gas fitter. Steam ovens need a water line and a drain or condensate loop. Run new lines rather than adapt old ones. A bad gas hookup is not worth saving money on.
Venting, steam, and heat paths
Plan where steam, heat, and moisture go. Steam ovens and indoor grills send lots of humidity and grease. Point vents to the outside. Keep moist air away from wood cabinets and painted walls. An underpowered hood will fog windows and warp trim.

Clearances, fit, and delivery
Measure doors, stairs, and elevators. Check clearances for airflow and service panels. Some built-ins need 2–3 inches of side or rear space. Leveling matters. A crooked oven door or uneven cooktop kills performance. Think about mounting brackets and flooring protection.
Get pro quotes and add to budget
Get written quotes for electrical, gas, and ventilation work. Ask for permits and inspections. Add labor, parts, and possible cabinet repairs to your budget. A cheap install will cost you more later. Get the right crew now.
Cost Over Time: Price, Energy, and Service
Start with the true price
The sticker is the start. You pay more later if you ignore running costs. Add energy, parts, and routine service. Ask: how long will this last? What must you buy each year? Run the numbers before you buy.
Read energy labels and do the math
Look for the EnergyGuide or Energy Star numbers. They list yearly kWh or BTU use. Do a quick calc:
If a wine fridge runs 24/7, those watts add up. If a specialty freezer runs rarely, a high draw may never pay off. A 1.5 kW unit run two hours a day uses 3 kWh/day. At $0.15/kWh that’s $0.45/day or $164/year.
Consumables and routine service
Some units ask for filters, cartridges, salts, or descaling. Those bills add up. Note filter life and cost. Note service intervals. If a unit needs yearly tuneups, add that to your budget.
For coffee shops and keen home baristas, machines vary wildly in upkeep. Check drip tray parts and pump life. A pro espresso machine can cost little to run if you maintain it.
Parts, repairs, and warranty
Read the fine print. Does the warranty cover labor or only parts? How long is the coverage for electronics, seals, or compressors? Ask the dealer for common repair costs. Search user notes for trends: noisy pump, failing thermostat, leaking valve. Those notes tell real stories.
Plan for resale value
A well-chosen specialty unit can raise curb appeal. A mismatched, seldom-used unit can drag value down. Keep service records. That helps when you sell.
Decide, Buy, and Keep It Working: Brands, Warranties, and Care
Choose a brand you can reach
Pick a name with local service. You want parts and techs nearby. Ask the dealer: who comes for service? How fast? Big brands like Miele, Bosch, Whirlpool, and KitchenAid often have local techs. A small brand may sound good. But if parts ship from overseas, you pay time and money.
Check warranty and parts
Read the fine print. Ask specific questions. Get answers you can use.
Try it and read simple reviews
Go to a showroom. Open the door. Turn the dial. Feel the controls. If a control feels cheap, walk away. Read user notes for patterns: leaks, noise, dead displays. Quick hands-on beats specs on a page.

Plan upkeep now
Set a simple schedule you will keep. Small chores stop big repairs.
A neighbor saved $300 by replacing a worn drain tube before it burst. Little work prevents big bills.
Keep records and train the household
Keep manuals, receipts, and a service log in one folder. Note dates, tech name, and parts replaced. Show family how to use and clean the unit. If you move, leave clear notes for the next owner. A cared-for appliance lasts and gives better value.
With brand access, clear warranty terms, and a simple care plan, you move toward a confident buy and long use.
Buy Smart. Live Well.
You can match needs to the right appliance. Know your space and habits. Weigh features, install needs, and cost over time. Pick a unit you can service. Buy what you will use. Keep it simple. Keep your kitchen calm.
Make choices that last. Read specs. Ask installers hard questions. Budget for energy and repairs. Follow the care steps. Use the warranty. Live with tools that work. Buy smart. Use well. Enjoy cooking more. Save time. Save money. Keep your life easy. Then step back and let your kitchen do what it should: serve you every day.


Honestly, the venting section made me laugh — until I installed my own hood and found out I basically needed to gut a wall. 😬
Lesson learned:
1) Measure twice, cut once
2) Ducting matters more than the hood brand
3) The 6-Inch Hooded Wall Vent with Damper works if your duct run is short
4) If you’re renting, don’t try this without landlord permission
5) Bring snacks for the installer (seriously)
Anyone else had a similar surprise with installation realities?
Also note: some hoods require a damper or backdraft preventer — check local code and manufacturer instructions.
Short runs and proper insulation around ducts really reduce noise too. Worth the extra materials.
Yup. Our landlord was NOT thrilled. We paid for a pro to avoid messing with structural things. Learn from my mistakes.
Bring snacks and beer to the installer = 10/10 advice 😂
Great, relatable list — thanks for sharing, Owen. Installation surprises are common. Short duct runs and direct exterior venting keep things simpler; long or convoluted duct runs reduce hood performance.
Quick PSA: if you’re swapping appliances you might need a dedicated circuit. The article mentions ‘Power, Venting, and Installation Realities’ — don’t skip that. Had a short when I tried to run a heavy espresso machine and a toaster at once. Learned the hard way. 🔌
Pro tip: label your breakers after any upgrade. Saved me so much time later.
Thanks for the heads-up, Ethan. Safety first — always check your panel and consult an electrician if unsure. Some high-powered appliances really do need their own circuit.
Exactly. Also, check amperage ratings on the appliance spec sheet before buying.
Loved the ‘Decide, Buy, and Keep It Working’ section. Warranties and care tips can save you a headache. Just wish there were more brand-specific maintenance checklists — like for Breville vs Gevi vs CASABREWS.
Great feedback, Hannah. A brand-specific maintenance checklist is a helpful idea — we’ll think about expanding that section.
Also check customer service reviews. A long warranty is worthless if the brand’s support is awful.
This line made me chuckle: ‘Buy Smart. Live Well.’
My take: live well by not buying 12 specialty appliances you’ll never use. I bought an expensive frother and only used it thrice. 😂
Ask yourself: do you want convenience (Keurig) or craft (Breville/Gevi)?
Also, the CASABREWS looks tempting for a dorm setup — opinions?
Honestly, pockets of regret = collecting specialty gadgets. Buy one great thing vs many meh ones.
Ha, good rule — fewer multipurpose, used-every-day items beat many single-use gadgets. CASABREWS is fine for dorms or first-time espresso explorers; just temper expectations vs. a Breville or Gevi.
Dorm life: CASABREWS or Keurig depending on space and whether you share a kitchen. Don’t bring a 20-bar commercial monster to a shared dorm kitchen 😂
I keep a small manual milk frother in my drawer. Cheap, takes 30 seconds, and less clutter than an electric frother.
I miss the days of simple tea kettles. But then, coffee happened ☕️
Good roundup. A few additional notes from my experience buying specialty appliances:
– Read user reviews focused on long-term use, not just first impressions
– Service networks matter: choose brands with local service centers if possible
– Think about resell value; some Breville models hold value better than no-name machines
Anyone have experience getting parts for older machines? I worry about servicing down the road.
Excellent additions, Carlos. Parts availability is critical — buying a brand with accessible replacement parts and manuals can extend the life of your appliance considerably.
I managed to find replacement gaskets and filters for a 7-year-old Breville from a third-party supplier. It kept the machine going another 3 years.
Check if the brand publishes service manuals — that’s a huge plus if you want to DIY small repairs.
Also, factor in shipping costs for heavy items when considering repair vs replace.
Solid guide. I appreciated the ‘Cost Over Time’ part — price tags lie. Bought a cheap espresso machine once and ended up paying more in repairs. If you’re into daily coffee rituals, think long-term. Gevi and Breville have different maintenance needs though; Gevi feels more commercial (and louder).
Also consider warranty length and whether a local shop can service the brand. Shipping a heavy Gevi back to Amazon for repair? No thanks.
Thanks for pointing that out, Sofia. Upfront cost vs. lifetime cost is a big factor. Maintenance and service availability matter a lot for espresso machines.
I budget for yearly descaling and a replacement gasket set. Saves me from surprise repairs down the line.
Great read. I’m torn between the Breville Barista Express and a cheaper option like CASABREWS. I want something with a grinder but don’t want to become a full-on barista making latte art every day 😅. Any owners here who can vouch for build quality and longevity?
I had a CASABREWS for a year before switching to Breville. It did the job but parts felt cheaper and the tamping/frother was inconsistent. Breville is more reliable if you’re making drinks daily.
Priya — Breville usually scores higher on build quality and parts availability. CASABREWS is fine for casual use but may need more TLC over several years. If you plan to use it daily, Breville’s investment often pays off.
Nice article — very thorough.
I live in a condo with limited ventilation and was worried about installing a high-power range. The 6-Inch Hooded Wall Vent with Damper looks compact, but is it actually effective? The section on “Power, Venting, and Installation Realities” helped, but I still have questions on noise levels and whether I need electrician help.
Also curious about energy costs over time: is a Gevi 20-Bar commercial espresso machine nuts for a home? 🤔
On energy — check the ‘Cost Over Time’ section notes. Commercial machines like Gevi use a lot more power and need more maintenance. For home, something like Breville or CASABREWS is more cost-efficient.
Noise levels: lots of hood fans are noisy at high settings. If noise is a dealbreaker, look for quieter ratings or multi-speed models.
I had an installer come by and they rewired a dedicated circuit for my espresso setup. Worth the safety and stability, but it’s an extra cost to consider.
Good points, Marcus. The hood you mentioned can work well in tight spaces, but effectiveness depends on proper ducting and installation. For noise and power, consult an installer — they can advise if your electrical panel supports high-draw appliances.
Gevi 20-Bar is likely overkill for most homes; it’s heavy on power and built for commercial throughput.
Love the breakdown between single-serve and full espresso machines. I went from a Keurig K-Express to a Breville Barista Express and the difference is wild — worth the learning curve if you actually like real espresso. Also, shoutout to the Ninja air fryer for weekday dinners. Quick Q: anyone using the CASABREWS CM5418 in a small apartment?
Thanks Laura — glad the comparisons helped. A lot of people will keep a Keurig for speed and the Breville for weekends. For the CASABREWS: it’s compact but check water reservoir capacity against your daily use.
Agree with Nico. If you want consistency and fewer refills, Breville or Gevi are better but pricier.
I have the CM5418 in my studio. It’s surprisingly good for the price, but you’ll refill the tank pretty often if you make multiple drinks. Great for occasional espresso though.
This article nailed the ‘Features That Matter’ section. Controls and capacity are everything for me. I love the Ninja 4-in-1 Pro Air Fryer because the presets actually work and the 5QT capacity fits my family.
One nitpick: could use a quick comparison table for controls (analog vs digital) — that would help visual shoppers.
Great suggestion, Maya. A controls comparison table is a handy idea — we’ll consider adding one in a future update.
Presets are great, but I still tweak time/temperature. Love that the Ninja lets me do that.
I prefer digital controls for precision, but analog knobs feel more durable. Depends what you value.
Also check for easy-to-clean parts. Ninja baskets can be dishwasher-safe — big plus.
Short question: is the Keurig K-Express strictly for pods? Or can you use a reusable filter with ground coffee? Trying to cut pod waste without going full espresso machine.
I use a refillable pod with mine — tastes different than true espresso but much less waste and cheaper long-term.
Keurig K-Express is primarily designed for pods, but there are reusable filters that fit some Keurig models. Check compatibility for your exact K-Express model before buying a reusable filter.
Anyone used the EUHOMY Portable Countertop Ice Maker? Thinking about one for weekend parties — capacity listed as 26.5lbs/day sounds great, but how big is the bucket and how often do you need to empty it? Space is tight in my kitchen.
I have one — the bucket holds maybe a couple of pounds at a time. For parties, you’ll be scooping into coolers regularly, but it’s still super handy.
Good question, Derrick. That model makes a lot of ice over a day, but the storage bin is smaller than the daily production — you’ll empty it frequently for continuous use. Check physical dimensions to ensure it fits your counter.