
Make Cloud-Soft Cream Every Time
You will learn to whip cream with your machine. Use the right cream and chilled tools. Beat slow, then build speed. Watch for soft, then firm peaks. Stop before grain. Add flavor. Serve cloud-soft cream tonight and enjoy every bite.
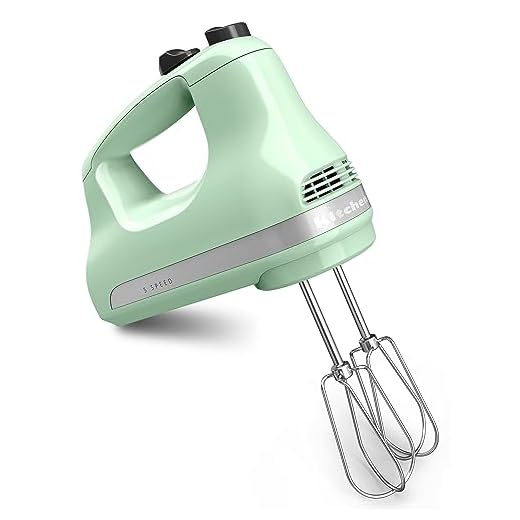
What You'll Need

Whip Cream Like a Pro: Perfect Texture in Minutes
Pick the Right Cream
Not all creams are equal — want firm peaks or sad puddles?Choose heavy whipping cream or double cream. Read the label.
Pick creams with 35% fat or more. Do not use light cream or coffee creamer.
Buy fresh cream. Check the date. Smell it. If it smells off, toss it. You will get firmer peaks with fresh cream. Low-fat creams give loose foam and will not hold shape.
Remember to buy fresh and check the date before you start. I once whipped old cream and the peaks collapsed.

Chill Your Bowl and Tools
Cold gear = faster lift. It’s a simple pro trick you can steal.Chill the bowl and whisk for at least 10 minutes. Use a metal bowl. Metal holds cold and gives firmer peaks.
Freeze the tools if you want speed. Place the bowl and whisk in the freezer for 10–15 minutes. Chill the cream in the fridge until very cold.
Stop and chill if things warm up. If the bowl feels room temperature or the cream loosens, pause and cool them again.
Use this quick checklist before you start:
Remember a hot kitchen. I once cooled the bowl on the porch and saved a collapsing batch.

Measure and Add Flavor
Small tweaks change taste and hold — sugar, salt, or gelatin?Measure sugar. Use about 2 tablespoons sugar per cup of cream.
Use powdered sugar for silk and extra hold. Add a pinch of salt to lift the taste.
Stir in vanilla at the start or the end. Taste as you go.
Dissolve a teaspoon of gelatin in a tablespoon of cold water for long hold. Warm until clear, cool, then beat in. Fold in a tablespoon of mascarpone per cup as a gentler stabilizer.
Keep flavors light so the cream stays bright. Use vanilla for classic cream. Use lemon zest for fruit, not heavy sauces. For a wedding cake I used gelatin. The cream held through the day.

Start Slow, Then Build Speed
Speed matters — slow to wake the cream, then let it roar.Attach the whisk. Start on low speed. Let small, even bubbles form. Watch the cream turn from flat to frothy.
After 30–60 seconds, raise to medium. Push steadily. Do not blast at high speed from the start. Big bubbles form and then collapse. Use medium-high to drive toward peaks.
Watch the cream. Stop and check often. Taste the texture with a spoon. For example, when you whip for berries, low then medium keeps it light and airy.
Stop and check often. Prefer to under-whip and finish by hand rather than overdo it.
Quick tips:
Start low.
Raise after 30–60 sec.
Finish at medium-high.

Spot the Peaks and Test
Soft peaks? Stiff peaks? Know the look and feel like a pro.Lift the whisk to test.
See soft peaks bend at the tip. See them hold when you fold in fruit or fill a pie.
See stiff peaks stand tall. See them hold shape for piping and decorative tips.
Stop at your target. Notice splitting or a grainy look — you passed stiff. Rescue over-whipped cream by adding a splash of cold cream and whisking by hand until smooth. Taste as you go. Use soft peaks for a berry tart. Use stiff peaks for star piping. Trust texture, not the clock.
Store and Serve Like a Pro
Keep peaks proud — quick tricks to hold shape and look great.Use cream soon. Chill it until service.
Keep your piping bag and tip cold. Fill the bag and rest it on ice while you wait. Pipe stars on cupcakes or rosettes on cakes. Pipe a ring of stars around a tart to show it off.
Fold in a spoon of mascarpone to firm the cream. Whisk in a small amount of dissolved gelatin for extra hold. Keep shape and clean taste.

Go Whip It
You have the steps. You have the tricks. Try once. Then you will know. Your desserts will thank you. Give it a go. Share your photos and wins. Come back and show us what you made today with pride always.


Short and to the point — I liked the peak-testing tips. Thought I was the only one who just eyeballs it until disaster strikes lol. Two things I learned:
1) cold tools = less drama
2) stop at soft peaks for piped decorations
Haha same. My kitchen used to look like a whipped cream crime scene. The fridge pause trick saved me once during a wedding cake test run.
Exactly — soft peaks for piping, firm peaks for cake layers. Also, if you’re piping and the cream loosens, pop it back in the fridge for 10 minutes and re-whip briefly.
This guide was super helpful — especially the bit about chilling the bowl and tools. I used to skip that step and my cream never got fluffy.
Quick recap of what worked for me:
– Heavy cream (36%+) really does make a difference.
– Chill everything in the freezer for 10–15 mins, not hours.
– Start on low and increase speed gradually until you see soft peaks.
Also love the “Go Whip It” energy 😂. Saved me from overwhipping a dessert at last-minute brunch!
Nice write-up. Been making cream like this for years and can confirm the soft peaks test is a game changer. Also, a splash of vanilla > everything. 😉
Agree 100%. I also swap regular granulated sugar for a little powdered sugar (1–2 tbsp) when I want a smoother texture — it dissolves faster and helps stabilize slightly.
So glad it helped, Sarah! Freezing the whisk for a few minutes also makes a noticeable difference. Great tip about not skipping the chill step — it’s easy to underestimate how much temp matters.
Good walkthrough but still confused about speed settings. My machine has 6 speeds — when do you jump from low to medium? I always end up overwhipping.
I use speeds 1→3 on my 6-speed machine. Also, set a timer for 30s and check — takes the panic out of guessing. 🙂
Start at the lowest speed until the cream thickens and starts to form ribbons (about 1–2 mins), then move up one or two notches. If you see grainy texture forming, immediately drop speed or stop and check for peaks. Every machine is a bit different, so better to err on the side of slower.
Tried this with coconut cream (yes I know it’s not the same) and it was… meh 😅
Is there a trick to making non-dairy creams hold up? I WANT peaks, not sad soup. 😭
Coconut cream can work but it’s trickier. Chill a full-fat can overnight, scoop only the solid part, and whip with a stabilizer like 1 tsp of cornstarch or a tablespoon of powdered sugar. You can also use commercial stabilizers or whipped topping powder for longer hold.
If you try xanthan, add it slowly and blend well at low speed so it disperses. Too much and you’ll get a gluey texture.
I make a semi-stable coconut whip by adding a small amount of xanthan gum (like 1/8 tsp) — be careful, a little goes a long way. Texture improves a ton.
Omg xanthan gum?? Never thought of that. Will try tonight and report back. Thanks! ✨
Thanks for the detailed steps — I wanted to add a troubleshooting note that would’ve saved me hours:
– If your cream turns grainy, you may have overwhipped a bit. Try folding in a tablespoon of unwhipped cream at a time to smooth it back out.
– For long holds (like for outdoor events), use a stabilizer (powdered sugar, gelatin, or a commercial product) and keep the bowl in a cooler until serving.
– Measuring flavorings helps: too much liquid extract can break the cream.
Also, storing in an airtight container and pressing plastic wrap directly on the surface keeps it from forming a crust.
For gelatin stabilization: bloom 1 tsp gelatin in 1 tbsp cold water, warm to dissolve, then cool slightly before drizzling into whipping cream at medium speed. Works wonders for party cakes.
Another storage tip: if you need to transport, pack the whipped cream in a cooler with ice packs and keep it upright. It’ll survive short trips much better.
Also, if you’re making chocolate whipped cream, sift cocoa powder first to avoid lumps. Little things add up!
Good point about extracts. Use concentrated ones sparingly. I learned that the hard way when my lemon extract made the cream watery.
Great troubleshooting tips, Lena — especially the folding-in trick. Adding a little unwhipped cream is my go-to fix for slightly overwhipped batches.