Start Getting Value From Your Pouches
You bought good pouches. You tossed some too soon. That stops now.
This piece shows clear ways to keep them. You will learn why they matter. You will learn simple steps to stretch their life.
Use less waste. Save money. Use your pouches more and throw less away. Read on and make your pouches work harder.
Fix small tears. Clean right. Pick the right size. Store dry and flat to last. Use them daily.


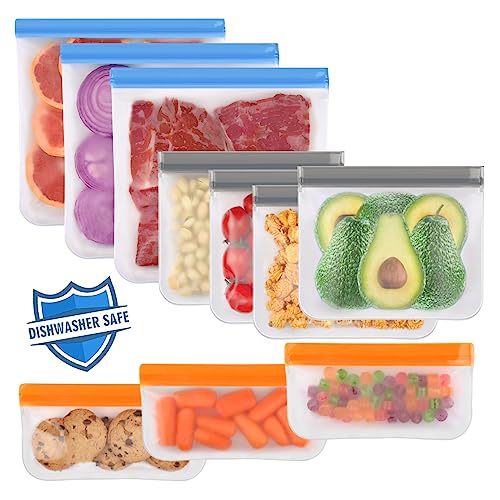
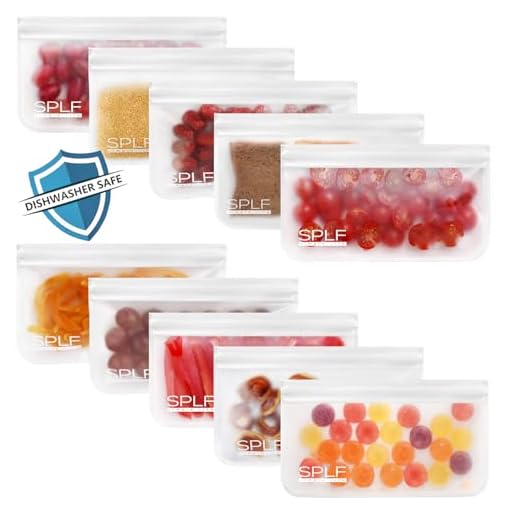
These Reusable Silicone Bags Replace 260 Plastic Bags — Eco-Friendly & Practical
Why Silicone Pouches Are Worth Your Time
Clear math: cost per use
A good silicone pouch costs $8–$18. You can use some for 200–500 times. That drops the cost to a few cents per use. A box of 100 single-use bags costs $5–$10. That is 5–10 cents per bag. The numbers add up fast. If you swap one pouch for 200 disposables, you save at least $10 and avoid a stack of trash.
Health and safety edge
Silicone is inert. It won’t leach like some plastics when heated. Most pouches are BPA- and phthalate-free. Many are oven-, microwave-, and freezer-safe. That means you can heat food in the pouch without the same worry you have with single-use plastics. Still, follow the maker’s heat limits. Use a thermometer or test a small batch if you try a new brand.
Waste you cut
One pouch equals hundreds of disposables. That cuts plastic film and zipper waste. It also reduces the demand for single-use production. If you carry food, you stop buying disposable boxes and bags. You make less trash at home and on the road. Small change. Big impact over a year.
How they simplify meals and travel
You can prep single portions. Freeze smoothies, sauces, or baby food. Toss a pouch in your bag for snacks. They seal tight and take little space when empty. At the airport, you skip packing jars. On hikes, you carry only what you need. Stasher-style pouches, clip-top models, and spout pouches each serve a simple travel role. Pick one and use it.
Use them like a tool
Treat the pouch like a kitchen tool. Match size to task. Rinse after use. Dry upside down. Keep a repair kit for small tears. Store flat. Label with a marker. Here are quick habits that pay off:
You need small care. It keeps the pouch in the game. Next, you will see the common ways people waste them and how to stop.
The Common Ways You Waste Them
You likely make a few small errors that cost time and life from your pouches. They are easy to fix. Spot the habit. Stop it today.
You overfill them
You stuff a pouch to the zipper. The seal gives way. Food spills in the bag or your bag. Fix it: leave a thumb-width of headspace. Use a bigger pouch for liquids or soups. Test a new brand by filling and closing it once before real use.
You stash wet pouches and trap mold
You put a damp pouch in a drawer or lunch bag. Mold grows in days. Fix it: rinse and air-dry open, upside down on a rack. If you must pack wet, stuff a paper towel inside to absorb moisture until you get home.
You use harsh cleaners and dull the seals
You scrub with bleach, scouring pads, or harsh detergents. The zipper roughens. The seal fails. Fix it: wash with warm soapy water and a soft cloth or bottle brush. For stubborn spots use baking soda paste. Avoid bleach and steel wool.
You heat pouches the wrong way
You microwave sealed pouches or place them on the stovetop. The pouch warps or pops open. Fix it: vent the pouch when microwaving. Use oven-safe models only where rated. Never put silicone directly on an open flame or broiler.
You shove sharp foods inside
Knife edges, bones, shells, and hard nuts slice the silicone. Fix it: wrap sharp bits in parchment or use a rigid container. Slice or chop foods before packing.
You store them folded in tight spaces until they tear
You cram pouches into a drawer and fold them sharp. The folds weaken the material. Fix it: store them flat or hang them. Stack like plates or use a simple pouch rack.
You toss stained or smelly pouches instead of fixing them
You see a stain and you throw the pouch away. Many stains lift. Fix it: soak in hot water and vinegar, scrub with baking soda, or leave in sun for a day. For odors, try lemon juice or a baking-soda overnight soak.
Spot these habits. Change one today. Next, learn to pick the right pouch for the job so these fixes matter less.
Pick the Right Pouch for the Job
You need the right tool. Not every pouch fits every task. Learn to read labels and feel the bag. Buy once. Use longer.
Read thickness and feel
Thin bags tear faster. Thick bags last longer. As a rule: thin (<0.5 mm) is light use. Medium (0.6–0.9 mm) is good for daily meals. Thick (≥1.0 mm) handles heavy work and freezing. Squeeze the seams. If they feel flimsy, move on. A good pouch has a firm mouth and a supple body.
Know the seals
Look for double zips or slider locks for wet foods. A single press-to-close can leak with soup. Slider zippers set fast and clearer. A clamp or screw-top works for very wet or oily foods. If you plan sous-vide or long marinades, get a pouch with a tested vacuum or clamp system.
Freezer and microwave rules
Check the label. Freezer-safe means the silicone won’t get brittle at low temps. Microwave-safe means you can heat it, but you must vent the pouch. Never microwave a sealed bag. For soups or sauces, heat in a bowl, then transfer. If you want to reheat in the pouch, choose one marked microwave- and steam-safe.
Size, mouth, and base
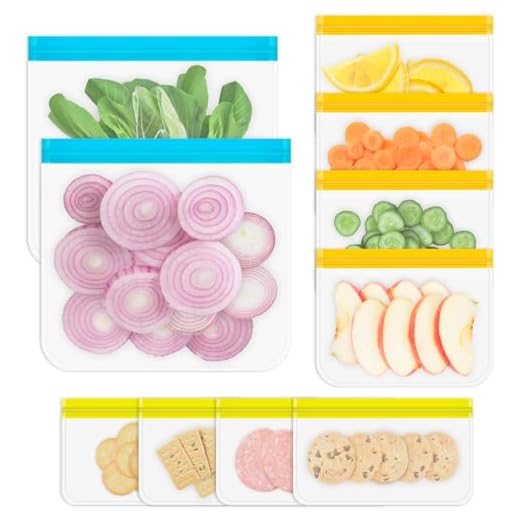
Size matters. Use small for snacks, medium for lunches, large for leftovers. Wide-mouth pouches let you spoon and clean easily. Narrow mouths are fine for straws and small pours. A gusseted base or stand-up pouch makes filling and storing easier in the fridge.
Material grade and real labels
Buy 100% food-grade silicone. Prefer platinum-cured. Look for FDA, LFGB, or EU safety marks. Ignore vague claims like “super durable” without specs. Marketing colors and photos mean nothing for strength.
Quick checklist to take shopping
Example picks: Stasher sandwich for daily use. Heavy-duty silicone pouches with a double zipper for soups and freezer loads. A thin snack bag for dry nuts only. Test one before buying a whole set.
Use, Clean, and Fix Them Like a Pro
Smart filling and sealing
Fill with room to spare. Liquids expand when cold and hot. Leave 1–2 inches at the top for pints and quarts. Stand the pouch in a jar to steady it while you pour. Close the zip with one smooth press or slide. Test the seal over the sink before you store soup.
Freeze without cracks
Cool hot food to room temp first. Lay flat on a baking sheet to freeze. Once solid, stack upright. For long items, fold gently; never cram a full pouch into a tight spot. Use thick (≥1.0 mm) bags for deep freeze work. They crack less.
Heat and thaw safely
Only heat in pouches marked microwave-safe. Vent the top. Never microwave a fully sealed bag. For soups, heat in a bowl then transfer. To thaw, use the fridge overnight. For quick thaw, run cold water while keeping the seal closed. If you must microwave to finish thawing, open the pouch and transfer to a microwave-safe dish.
Quick clean tricks that kill smell and grease
Rinse soon after use. Grease sets if you wait. For stuck-on oil:
Dishwasher or hand wash?
Top rack is fine for many pouches. But metal racks and high heat can age the seals. Hand wash when:
Dry and store to dodge mold
Air dry fully, mouth open, upside down on a rack. Do not fold while damp. Store with the zip slightly open in a drawer or box. Toss a silica packet or a small box of baking soda nearby for moisture control. Rotate use — don’t bury pouches for months.
Simple repairs
For small holes or seam splits, check the maker first for replacement parts or sliders (Stasher often offers spares). If you must fix at home:
Use these steps and the bags last. Keep them clean, sealed, and patched. Your next pouch will earn its keep.
Get More Value with Smart Uses and Repurposes
Meal prep that saves time
Use pouches to portion meals for the week. Cook once. Divide into single servings. Label with the date and a reheating note. For sauces, freeze flat so they stack. For salads, pack dressing separate. Pull what you need the night before. Your mornings get calm. Your fridge stays tidy.
Freeze, thaw, and reheat with little fuss
Freeze flat for fast thaw. Stack and store like books. Thaw in the fridge overnight. For fast meals, cut a corner and pour into a pan or bowl. If a pouch is microwave-safe, vent the top. For soups and stews, reheat in a pot for best texture. Use clear labels: meal, date, cook time.
Travel, baby, and gym hacks
Pouches cut mess on the road. They hold yogurt, baby food, protein shakes, and dressings. Use them to portion snacks for kids. At the gym, pack wet wipes, a pair of socks, and a bar. On flights, keep chargers, cables, and adapters in a pouch. They take little space and never leak onto your bag.
Non-food uses that pay off
Treat pouches as tiny toolboxes. Use them for:
They keep small things together. They keep them dry and visible.
When to retire and how to repurpose
Retire a pouch when the seal fails, the plastic thins, or odors linger after a deep clean. If it’s no longer food-safe, give it new life. Use old pouches as:
If you patch a pouch with non-food-safe material, mark it for non-food use only. That keeps you safe and the pouch useful.
Now you have new moves. The pouches you own can do more. Move on to the final notes.
Use Them Well. Save Money and Waste.
You now know the key moves. Buy right. Use right. Clean and fix. Repurpose when you must. Small care adds weeks and months of use. Do a few simple habits and the pouches pay you back. Start today. Keep a good pouch longer. Your trash will shrink. Your wallet will thank you. Keep it simple. Make it a habit. Little acts add up.
You will waste less and save more. Start now and treat each pouch like a small investment.


Good roundup — I bought the Lerine 10-Pack last year and the article’s tips on cleaning saved me a ton of time. Quick note: I microwave-steamed a stuck-on sauce once and it came out fine, but I stick to dishwasher now.
Also agree on picking the right pouch size — Annaklin stand-ups are my go-to for bulk meal prep.
Thanks for the tip, Mark! Glad the cleaning section helped. The stand-up bags are great for soups and sauces — just be careful with high-fat splatters in the microwave.
Same here — Lerine holds up well. I usually turn the bag inside out before the dishwasher to get crumbs out.
Good reminder about size. I tried freezing stew in the snack-size and regretted it 😂
Quick rant: bought cheap knockoffs and they peeled on the seam after one wash. Lesson learned— spend a tiny bit more on a reputable 10-Pack like Lerine or SPLF. Also, PSA: rinse immediately if you’re storing tomato sauce. Otherwise stinking city 😂
Sorry you had that experience, Lena. Quality varies—that’s why we highlighted the brand list. Immediate rinse is a good habit.
Same happened to me with cheap ones. Now I stick to Annaklin or Lerine.
Longer note from a busy parent:
I have PandaEar refillables for baby food and the Annaklin stand-ups for homemade applesauce. The PandaEar zipper is easier for small hands (and less spill-prone) but the Annaklin is sturdier for bulk.
Cleaning routine: rinse -> soak in warm soapy water -> run through dishwasher every few days. Don’t forget to prop them open so they dry completely.
Also — if you’re worried about BPA and plastics, these pouches are a HUGE win. Worth the investment even if you buy a mix of brands.
Thanks, Emily — we’ll add the drying suggestion to the ‘clean and fix’ section in the next update.
PandaEar for small hands is a great call. I’ll buy a few for weekend babysitting duty.
I use a small bottle rack and hang them inverted. Works like a charm.
Fantastic breakdown, Emily. The drying tip is essential — mold likes closed damp spaces.
How do you prop them open to dry? Tongs or a rack?
Also good to rotate pouches so you’re not using the same few every day — extends lifespan.
I appreciate the ‘use like a pro’ section. A couple of things I do:
1) Label bags with a dry-erase marker for batch date.
2) Don’t overfill zippers — you need room to seal.
3) For long-term freezer storage I use the 10-Pack Reusable Freezer bags flat to save space.
Also — pro tip: if a seal gets sticky, rub a tiny bit of food-grade oil on it and wipe off excess. Works wonders.
Great practical tips, Owen. Labeling is underrated — thanks for sharing the oil trick too (good for stubborn zippers).
If you test oils, use very small amounts and wipe well. Too much can attract dirt.
Labeling with a date is everything. I keep a Sharpie in the drawer with my pouches.
Oil? Huh. I might try coconut oil but will test a corner first.
Love the repurpose ideas. I now use an old Annaklin bag as a travel laundry pouch and the PandaEar ones for homemade baby yogurt. Also: who knew they’d be decent ice packs? (Freeze partially, then wrap in cloth.)
Minor gripe: article could’ve gone deeper on safe temperatures for microwaving. Vague ‘like a pro’ tips are fine but specifics help.
Good point, Brian. We kept it general to avoid giving risky advice, but here’s a quick rule: if the manufacturer says microwave-safe, use low power and avoid direct contact with heating elements. We’ll consider adding more specifics.
Agree the microwave section felt light. I avoid microwaving them unless absolutely necessary.
Partial-freeze trick for ice packs = game changer.
Thanks for the suggestions — we’ll add a short microwave safety checklist in an update.
Travel laundry pouch — that’s brilliant. Stealing that idea.
Anyone tried sewing little fabric covers for the pouches for aesthetics? Not necessary but kinda fun. On-topic: the SPLF 10-Pack lasted through beach trips and ketchup explosions. Solid product.
Love the creativity, Carlos. Fabric covers are a cute idea — good for branding or gifts too.
Okay, long post incoming — I have been experimenting with reusable silicone pouches for 2 years and this article pretty much nails it.
– Start getting value: absolutely — stop treating them like disposables
– Common waste: I guilted myself into throwing out warped ones, but a soak + gentle scrub usually fixes that
– Fixing: super useful section, used a hair dryer to reshape a misshapen seal once
If anyone wants a quick guide to which pack for which task (freezer vs snacks vs baby food), I can type it up.
Would love a simple chart: pantry/snack/freezer/baby. Saves me research time.
Daniel: if you post it here, I can pin it as a highlighted reply for others.
Please do — I’m confused between the 10-Pack Reusable Freezer bags and the Annaklin stand-ups for stews.
Sure — I’ll write it up in a bit and post. Quick preview: PandaEar for baby food, Annaklin for liquids and bulk, Lerine and SPLF for everyday sandwiches, generic freezer ones for flat-freezing.
We’d love that — a short cheat-sheet would be great to add as a comment resource. Thanks for sharing your experience!
Daniel, your hair dryer trick — genius. I might try that for a warped SPLF bag.
Short: article = useful. Two notes:
1) If you’re freezing, lay flat first so you can stack.
2) For baby food, the PandaEar pack with a small spout is way easier than trying to spoon into a pouch each time.
Thanks for the practical pointers — saved me money already!
Thanks, Nora — flat-freeze is such a simple hack but it transforms storage. Glad it helped!
Agree on the spout. Also, freeze in portion sizes so you don’t defrost too much.
I liked the repurpose ideas. Never thought of using the PandaEar refillable pouches for smoothies before — that sounds cute for kid lunches. Neutral on the price though; some of these packs are pricey where I live.
Short and sweet: thanks for the cleaning tips. I was worried dishwasher-safe meant they’d fall apart, but mine survived a few cycles. One question: anyone else get weird smells after freezing garlic? 😅
Yes — garlic can linger. Try a paste of baking soda + water inside, leave for a few hours, then rinse. Lemon slices can help too if the pouch material is okay with it.